Feeds:
Posts
Comments

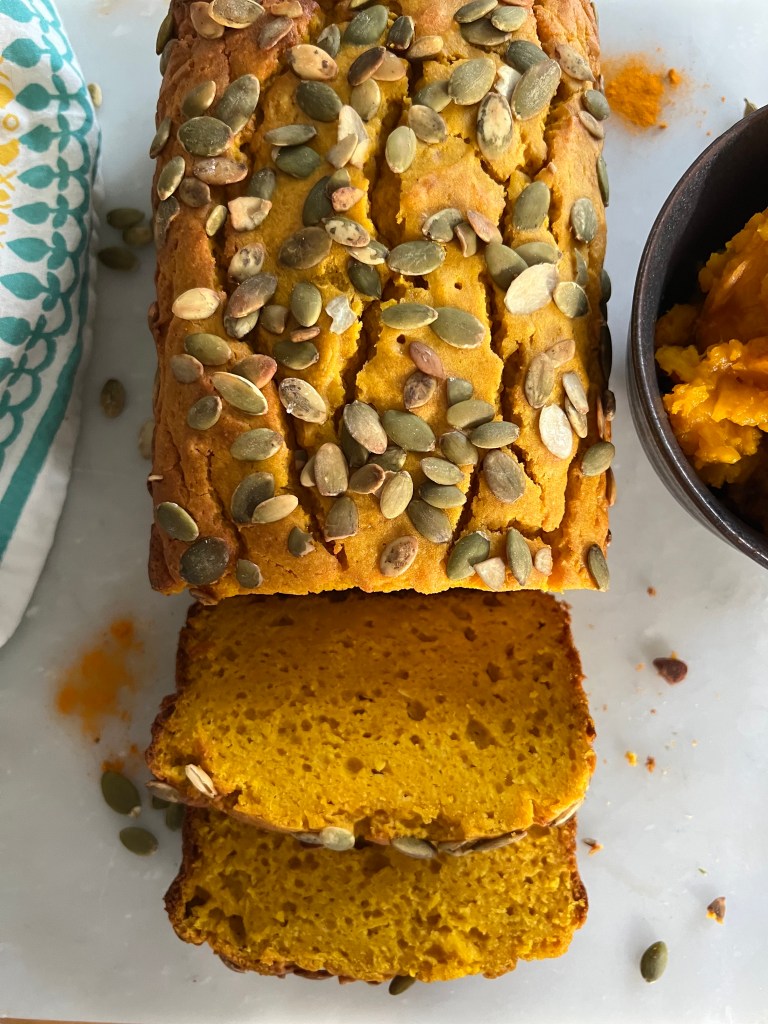
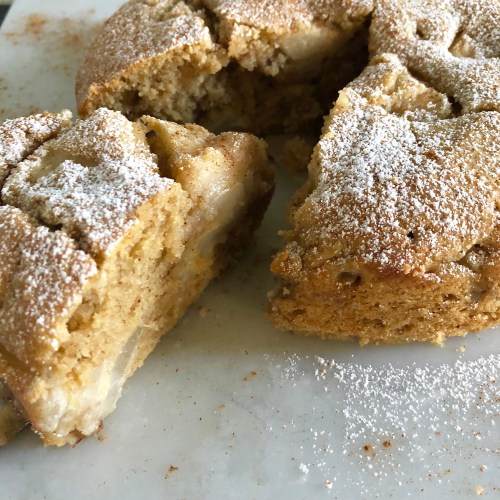
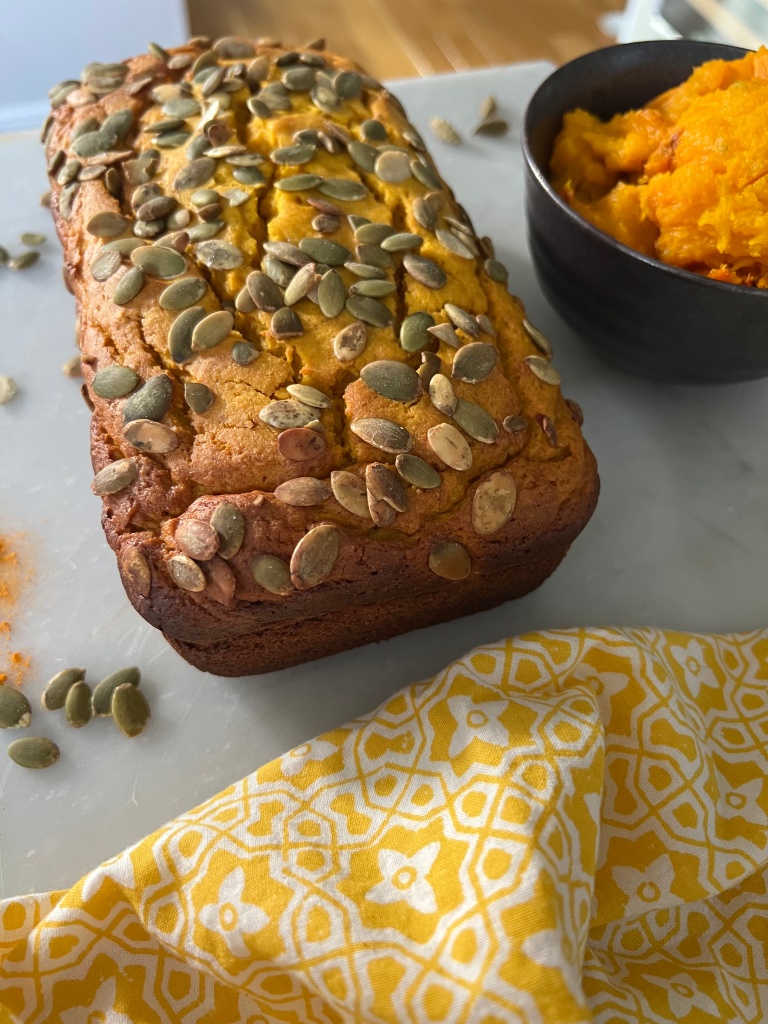
Just look at the gorgeous color of this cake! It exudes Fall feeling, and makes me think of pumpkin patches, warm creamy soups, and trees turning.

When the immensely-talented Seattle-based cookbook author, stylist and photographer, Aran Goyoaga of Cannille et Vanille, reposted her Roasted Kabocha Squash Cake with Turmeric and Cardamon recently, I knew I had to make it–immediately. In addition to its beautiful color, it’s the perfect treat to serve with afternoon tea or with breakfast or brunch for your Thanksgiving guests who stay overnight.

However, if you follow me on Instagram or if you’ve read any of my blog posts, you know I am always trying to reduce my sugar intake, as well as that of my kids’ (and basically that of everyone I encounter). I’ve read countless studies, listened to numerous doctors and nutritionists, and it’s an indisputable fact that sugar is bad for us. It wreaks havoc on our metabolic health and leads to insulin resistance which is the main driver of cardiovascular disease as well as the driver of diabetes and dementia. But, I digress.

That’s why every recipe I develop contains relatively low amounts of added sugar, and why I typically half the amount of sugar called for with nearly anyone else’s recipe(s). I’ve made this cake (bread) several times now, experimenting with different flours (almond, tiger nut, etc) and using half the sugar originally called for. It turns out beautifully each time.

Aran’s original recipe uses 3/4 cup brown rice flour, 1/3 cup tapioca starch and 1/4 cup potato starch, but when my long-time foodie friend, Alaina of Furthermore Ventures, asked me to try using Renewal Mills 1 to 1 Gluten-free Baking Flour, I happily obliged and made the cake as follows* (and as pictured).

Ingredients

1 large kabocha squash (see note below)

1/4 cup unrefined sugar (plus optional 1 tsp sugar for sprinkling)

1/4 cup maple syrup

3 large eggs

1/2 cup (110 g) extra-virgin olive oil, plus more for greasing

1 tsp pure vanilla extract

3/4 cup plus 2 tablespoons Renewal Mill 1 to 1 Gluten-free Baking Flour

1/3 cup (35 g) tapioca starch

1/4 cup (40 g) brown rice flour

2 teaspoons baking powder

1 teaspoon ground turmeric

1/2 teaspoons ground cardamom

3/4 teaspoon kosher salt

3 tablespoons raw pumpkin seeds

*Aran’s original recipe calls for 3/4 cup sugar and 1/4 cup maple syrup which you can see from above I reduced to 1/4 cup each. Her recipe also uses 1/4 tsp ground cinnamon and 1/4 tsp ground cardamon, but prefer the flavor when the cinnamon is eliminated all together and the cardamon in increased. I also think the vanilla is a nice addition. This cake is pretty forgiving, so feel free to experiment as I have.

Preparation

Preheat oven to 400F. Cut the squash in half and scoop out all the seeds. Rub or brush a little olive oil on all the cut and scooped surfaces and place on a parchment-lined baking sheet cut-side down. Bake for 45 minutes or until flesh is tender when pierced with knife or fork. Set aside until cool enough to handle.

Reduce heat to 350F. Grease the inside of a pound-loaf pan (8.5-inches by 4-inches approximately) with olive oil. Cut one strip of parchment paper (approximately 7 x 13 inches) and fit it in the pan crosswise leaving a bit of overhang. This makes it super easy to lift the cake out of the pan.

Scoop the flesh out and measure 1 cup (225 g) into a blender (e.g., Vitamix). Add the sugar, maple syrup, eggs, vanilla extract and oil and blend until smooth.

In a medium bowl, whisk together the flours and starch, baking powder, spices, and salt. Pour in the wet ingredients and stir until it comes together into an even, thick batter. Pour into the prepared pan and smooth out the top with your spatula. Sprinkle the top with pumpkin seeds and about 1 teaspoon of sugar (optional).

Bake the cake for 45 to 50 minutes until a toothpick inserted in center comes out clean. Let the cake cool in the pan completely, then lift out and serve. Store the cake tightly wrapped in the refrigerator for up to 3 days.

Enjoy!

Apricot Almond Cake

Yes, it’s been ages since I posted any recipes here, but you know, sometimes life gets a little sticky and finding time to post gets tricky. That said, I haven’t stopped cooking (as you know if you follow me on Instagram!), and I now have dozens of recipes I hope to share with you here!

This Apricot Almond Cake fits where I am in my life so perfectly that it provides the perfect re-entry into blogging for me. It is crazy simple to make–both in terms of time and effort, and it’s really delicious, especially if you’re an apricot lover like me. When I say “simple,” I mean you can prepare it in less than 15 minutes (excluding cooking time, of course). It is moist, flavorful and perfect for any occasion.

Like most of my recipes, this cake is also low-sugar, dairy-free and gluten-free. I first made it with canned peaches, because fresh apricots weren’t available at the time, but this cake wants to be made with apricots–trust me!

Ingredients

1 cup gluten-free all-purpose flour*

1/2 cup almond flour

1/3 cup evaporated cane juice

1 1/2 tsp baking powder

1/2 tsp sea salt

2 pasture, free-range eggs

1/2 cup extra virgin olive oil

1/2 cup unsweetened almond milk

1 tsp pure vanilla extract

1/2 tsp almond extract

4-5 small, ripe apricots, cut in half and pitted

1 Tbsp apricot jam

Preparation

Preheat oven to 350F. Grease a 9-inch cake pan with olive oil and line the bottom with a disk of parchment paper. Set aside.

Whisk the dry ingredients together in a small bowl until well-blended.

In a medium bowl, whisk the eggs until pale yellow in color. Whisk in the oil, milk and extracts. Stir the dry ingredients into the wet until thoroughly blended. Pour into the prepared cake pan. Arrange the apricot halves, cut side up, in the pan. Place in the center of the oven and cook for 30 minutes.

While the cake is cooking, mix about 1 teaspoon hot water with the apricot jam in a small bowl. After the cake has baked in the oven for 30 minutes, remove it and spread the jam carefully over the top. Return cake to the oven and bake another 15-20 minutes or until a toothpick inserted comes out clean.

Allow cake to cool completely before serving, about 30 minutes.

Enjoy!

My continuing research about how to improve my overall health, has led me to modify my diet so that it’s 70 to 80 percent fruits and vegetables, with a little starch and protein to round it out. I am primarily eating fish (every possible kind of seafood) and fowl (chicken and duck) for my protein, which is what I relied on for my main source of protein for the 24 years I didn’t “eat mammal.” I try to get my starch from healthy sources like sweet potatoes, but I’m half Japanese, so I regularly eat rice. I’m also not one to give up all comfort foods, so I occasionally make gluten-free pasta using brown rice or chickpea flour pastas, which the kids love. I often toss the pasta with chicken sausage, braised chard and fresh tomatoes to “health it up.” And since dairy and I remain estranged, the only dairy I consume is a little grass-fed butter, ghee and organic whole-milk, Greek-style yogurt on occasion.

Since my diet is mainly focused on vegetables, I’m reframing my idea of what constitutes a meal. I grew up with the idea that dinner included a main dish–usually involving meat, accompanied by a simple salad and cooked vegetable. My new favorite thing to do is cook 3-4 vegetable side dishes, which together with a little protein make a fun, nutritious and not-at-all-boring meal in which there is not necessarily an obvious “main dish.” And I truly dislike eating salad for the sake of eating salad, so I’m continually searching for salads that feel like a meal in and of themselves.

I made, served and ate this particular salad this past summer, but it’s really a dish for all seasons, and all its ingredients are readily available year-round. It’s from the Jerusalem cookbook by Ottolenghi and Tamimi. I’m a huge fan of all Ottolenghi’s cookbooks, having first discovered his incredibly delicious food in a tiny shop off Kensington High Street when I lived in London many moons ago. I was new to London–and newly pregnant, and stumbled upon the tiny shop purely by accident. Even though I lived in London only a few years, I considered a takeout meal from the shop a special treat. I fondly remember marveling at all the delectable looking dishes displayed in tiers in the shop front window. My mouth would instantly start watering upon seeing the array of colorful vegetable dishes and beautiful, yet simple desserts. Everything was fresh, flavorful and colorful. What I appreciate most about Ottolenghi’s cooking is that (most of) the dishes are relatively simple to make relying heavily on an abundance of spices and variety of textures. It’s what makes his food beautiful to look at and delicious to eat.

Most of the recipes I share on my site are completely my own invention, or they are ones I’ve modified from someone else’s recipe, or developed by combining various parts of several people’s recipes. However, this one I want to share as is because it’s perfect just as it is. One caveat is that I’ve been making it so often that I’ve stopped measuring the ingredients, and it’s fair to say you have a lot of leniency with this recipe; a little extra this or a little less that still results in a delicious salad.

Ingredients

1 tbsp white wine vinegar

1/2 medium red onion, thinly sliced

3-1/2 oz/100 g pitted, Medjool dates, quartered lengthwise

2 tbsp unsalted butter

2 tbsp olive oil

2 small pitas, roughly torn into bite-sized pieces

1/2 cup/75 g whole unsalted almonds, coarsely chopped

2 tsp sumac

1/2 tsp chile flakes

5 oz/150 g baby spinach leaves

2 tbsp fresh-squeezed lemon juice

salt

Preparation

Place the dates and onion slices in a small bowl. Add the vinegar and pink of salt and mix well with your hands. Leave to marinate for 20 minutes.

While the date mixture is marinating, heat the butter and half the olive oil in a medium frying pan. (I use my 10-inch cast-iron pan.) Add the pita and almonds and cook for 10-12 minutes, stirring all the time, until the pita is crunchy and golden brown. Note: The Ottolenghi recipe actually says to cook the pita for 4 to 6 minutes, but that has never been enough for me, so maybe our US pita cooks differently. Remove from the heat and mix in the sump, chili flakes, and 1/4 teaspoon salt. Set aside too cool.

To serve, toss the spinach leaves with the pita mix in a large bowl. Drain off and discard any extra vinegar from the date/onion mixture before adding the dates and onion to the spinach. Add the remaining olive oil, lemon juice and another pinch of salt. Adjust seasoning as desired and serve immediately.

Enjoy!

Here in northern California, we’ve been experiencing the full wrath of Mother Nature, who is clearly fed up with the overall lack of respect and abuse humankind has given her. In addition to devastating fires and intense heat, we’ve had seriously bad air quality since mid-August. Well, we did have a few days reprieve last week, where we all went outside, rubbing our eyes unaccustomed to bright sunlight, looking like people emerging from underground bunkers after a blitzkrieg.

Unfortunately, the reprieve was short-lived, another fire sprang up, and we find ourselves advised to stay indoors once more. It’s also very warm, again, so I’ve been hesitant to use the oven. It’s not like I can just open the windows to cool down the house at night—due to the bad air quality, and since hot temperatures are historically unusual for my area, almost no one has AC in their homes.

I try to cook dinner in a skillet whenever possible, and we’ve been consuming a lot more salads. Good news is, I have several new favorite salad recipes to share! However, those salad recipes will need to wait because right now, I want to share a delicious recipe for peanut butter and chocolate rice crispy treats! My kids–like so many others, love traditional rice crispy treats, but I can’t stomach all the sugar found in regular recipes nor do I like the fact that there is nothing remotely beneficial in them.

I’ve been tinkering around with making a peanut butter chocolate version, but was struggling to get the flavor profile right along with the right “glue” to hold the rice cereal together. One version used honey, which overpowers in flavor. One version had the chocolate blended in with the peanut butter, which helped to hold the rice cereal together, but I prefer it when the chocolate gets to hold its own, so if you’re a peanut butter and chocolate lover like me, you get two distinct flavors. I also wanted a recipe where you make your own chocolate layer from scratch instead of just melting down a bunch of chocolate chips. For one, you can better regulate how much sugar is in the chocolate.

These bars are super easy to make, super yummy, and they don’t require you to turn on your oven!

Ingredients

3/4 cup creamy organic peanut butter

1/4 cup coconut nectar

1/4 cup plus 3 Tbsp pure maple syrup, divided

2 tsp pure vanilla extract, divided

1/4 tsp sea salt, divided

4 cups organic brown rice crisp cereal

1/2 cup raw cocoa

1/3 cup full-fat coconut milk

1/4 cup coconut oil

Preparation

Line a 9-inch x 11-inch baking pan with parchment paper, folding the paper in the corners and making sure the paper comes up the sides.

In a large bowl, whisk together the peanut butter, coconut nectar, maple syrup, 1 tsp of the vanilla, and 1/8 tsp sea salt. Fold in the cereal and stir until thoroughly combined. Scoop the mixture into the pan and press it down firmly and evenly. If you don’t press enough, the the bottom of the bars may crumble when you’re eating them. Place the pan in the fridge.

In a small saucepan, over low heat, whisk the raw cocoa powder, coconut milk, and coconut oil until everything is smooth and glassy. Add a little more coconut milk if the mixture looks too thick to spread over the cereal mixture. Remove from heat and whisk in the vanilla extract and 1/8 tsp salt.

Spoon the chocolate over the cereal mixture and spread evenly with a rubber/silicone spatula. Return to the fridge until the chocolate is hardened. Cut into squares–I usually cut mine into 9-12 squares. You can store these cookies for 4-5 days in an airtight container in the fridge.

Enjoy!


I hope you and your loved ones are staying healthy! These extraordinary times we’re living in seem to be challenging just about everyone–even those with secure jobs and plenty of resources.

Here in Northern California, we’re also experiencing horrific wildfires and the resulting smoke, which makes the air quality so poor you often can’t go outside to escape the stress of being cooped up because of Covid-19. What’s more, the recent heatwave brought thousands of tiny ants into my home, and one day, a few dozen large ones. I tried joking with friends about the “fire, plague and pestilence,” because when you think about it, things are so bad it can seem unreal or surreal, and you almost have to be able to joke about it to keep sane.

I try to cope by reminding myself of all the good things I have in my life–particularly my health and my children’s health. I also remind myself that it’s pointless to worry about those things I have absolutely no control over. And I take joy in small things–like seeing a fawn with its mother on my lawn, a funny meme one of my kids shares with me, a simple but delicious meal or favorite sweet. (Of course, there’s always Netflix, too!)

Back to the food… I love this salad! I’ve been making it nearly every week since May, and I definitely rate in among my top five favorites. It boasts beautiful color, complex flavor and texture, and you can easily source its ingredients all summer and into autumn. It has just the right combination of sweet, savory, soft and crunchy, and the chili-lime vinaigrette gives it just a little added kick. You can make a vegan version leaving out the feta.

Make sure you use a nicely ripe watermelon. My nearly full-proof technique for choosing watermelons is to pick one up and rap on it gently with my knuckles–just like you would knock on someone’s door. If you get a true “hollow” knock, then the melon is ripe. If you get more of a “thud” sound, try another.


Ingredients (for 4-6 servings)

1/2 a ripe watermelon, rind/seeds removed and cut into 1-inch cubes

2-3 golden beets

1 large handful sugar snap peas, trimmed and sliced thin

1/2 cup firm feta (I use sheep’s milk feta)

2 large handfuls arugula leaves

1/4 cup extra virgin olive oil

Juice from 1 lime* (about 3 Tbsp)

1-1/2 tsp ground chili pepper

1/2 tsp sea salt

Optional: 1/3 cup chili lime pepitas (recipe follows)

Mix 1 cup raw pepitas with 1 tsp olive oil, 3/4 tsp salt, 1/2 tsp smoked paprika or ancho chili powder, 1/4 tsp cayenne pepper and the juice of one lime. Preheat oven to 325F. Spread pepitas on a parchment-lined baking sheet and bake 12-15 minutes or until golden brown.

*Get the most juice out of your lime by pressing down on the lime while it’s still whole, and rolling it while pressing down on it against a countertop or cutting board.


Preparation

Trim away any roots or pointed tops on the beets, wrap in foil and roast in the oven or toaster oven at 375F until cooked through, 30-40 minutes. Let cool. Run under cold water to help slide the skin off. Cut into 3/4-inch cubes. Place in a large bowl.

Add cut watermelon, snap peas and arugula and toss to combine.

In a small bowl, whisk together the olive oil, lime juice chili pepper and salt. Drizzle over the watermelon and beet mixture and toss to coat evenly. Crumble feta over the salad and lightly toss. Sprinkle toasted pepitas if using and serve immediately.


Enjoy!


Almond hempseed pancakes


Happy almost end of “not-like-any-other” summer! I hope you and your loved ones have kept healthy–both physically and emotionally. These are extraordinary times for sure, and so many of us regularly feeling anxious, stressed, even depressed. I hope you have been managing all right. I’ve developed my own strategies for staying (relatively speaking) positive and optimistic. I recognize (and remind myself!) that the pandemic is temporary, even if it’s not as temporary as we had initially hoped. I try to spend as much time in nature as I can, which has been challenging since I’m working full-time and raising two children who can’t be in camp due to Covid-19 restraints.  I also bought an excellent book on mindfulness, which has helped me reduce stress more than meditation has because it’s very purposeful and intentional and helps me reshape and redirect my thinking. I found mediation was leaving too much to chance even if it helped me relax.

Of course, I’m also trying to maintain a healthy diet so I’m better protected against the Coronavirus–or any virus for that matter, and so I can maintain a healthy weight since I can’t go to the gym anymore and my workouts are more sporadic. I will admit I’ve fallen victim to the Covid-19 snack phenomenon, whereby I often find myself standing in front of my refrigerator, door open, considering what to eat when I’m not actually hungry! Do you know what I’m talking about?? There have been so many funny memes posted about this, and it really gives us insight into the human psyche.

But back to the pancakes… I have made these my go-to breakfast because it’s super easy to whip up a lot of batter, store it in a glass jar in the refrigerator, and quickly make a nutritious, delicious breakfast for days to come. I usually don’t put maple syrup on mine, and instead use a big dollop of my strawberry chia puree, which I also make a big batch of and keep stored in the fridge.

These pancakes are really good, eggy in texture and packed with protein thanks to the four eggs, almond flour, hempseed and collagen peptides. Sometimes I make them with extra cinnamon, but then use maple syrup instead of the strawberry puree so the strawberry and cinnamon aren’t competing with each other. And the best part? You can just throw all the ingredients into your Vitamix or other high-powered blender and voila!


Ingredients

1 large banana

4 eggs

1/4 cup almond milk

3 Tbsp coconut oil, melted and cooled

1 cup almond flour

1/2 cup raw hulled hempseed

1/2 cup tapioca flour

2 scoops collagen peptides (I like this brand)

1 Tbsp coconut sugar

1 tsp baking powder

1 tsp ground cinnamon*

1/2 tsp salt

*If you want the super-cinnamony version, use 1-1/2 Tbsp cinnamon


Preparation

Blend everything together in a high-powered blender until completely smooth. Cook in a buttered or oiled cast iron or nonstick pan over medium-low to medium heat until golden brown (3-4 minutes). Flip and cook the opposite side until just golden (1-2 minutes).

Strawberry Chia Puree (made in advance)

In a glass bowl or large glass jar, stir 4 cups fresh or frozen pureed strawberries with 2 heaping tablespoons chia seeds, the juice of half a lemon, 1 teaspoon pure vanilla extract and 1-2 tablespoons maple syrup. Cover and let sit in the fridge for four hours before using. Store in the fridge for up to five days.

Be well, and enjoy!


I hope you are in a safe place–both physically and emotionally. Last week was a very difficult one for our nation, for our nation’s black community, and for many of us individually.

I won’t begin to think I am informed enough or experienced enough to talk about the struggles that so many people of color still face today across our nation. What I will say is that I am fully aware of my white (half-Asian, actually) privilege, and I remind my children of it regularly–not just speaking of the color of their skin, but also the circumstances into which they were born.

But above all else, I try to teach them to treat everyone with kindness and compassion, to look beyond any outward appearance or labels (e.g. black/white, gay/straight, racist/antiracist). After all, while there may be an occasional bad egg amongst all the good ones, racism is born out of ignorance, and it’s often born into. Our country is vast, our neighborhoods are mostly still segregated, and that ignorance is allowed to continue year after year, generation after generation.

I do believe we all have a responsibility to be actively antiracist, and we have a responsibility to seek to understand.

I stress-bake, and I stress-eat, so was doing a lot of both last week. Luckily, I still managed to keep it healthy. Here’s a dish that’s colorful, tasty and easy to prepare (although you need to allow 30 minutes to cook the farro and 35-40 minutes to roast the beets). You might be thinking, wait, isn’t she gluten-free? No, I’m not. I rarely eat gluten, but I have no obvious intolerance to it, and indulge occasionally when it’s something I really like, such as farro–because I just love the texture and slightly nutty flavor, and a good loaf of pain levain.

Farro, like Einkhorn, hasn’t gone through all the hybridization that modern wheat has (which has significantly increased the gluten content of today’s wheat), so it’s largely believed to be much the same grain as it was more than 100 years ago. While it still poses real dangers to celiac individuals or anyone with high gluten sensitivity, it (luckily) can be enjoyed by the rest of us.

This recipe serves as a great main dish for lunch or a side dish for dinner, and it travels well for a picnic at the beach. You can also make it vegan by leaving out the feta, although it changes the flavor profile.


Ingredients

1/4 cup olive oil

2 Tbsp red wine vinegar

2 cups cooked farro*

2 golden beets roasted at 375F until tender (about 35-40 minutes)

1 cup mixed radishes, trimmed and quartered

2 oz feta (I use a sheep’s milk version)

3 Tbsp chopped fresh chives

2 Tbsp chopped fresh parsley

Salt and fresh-ground pepper to taste

* Place 1 cup of farro in a medium saucepan. Wash and rinse 2-3 times. Add two cups water and place over medium-high heat. When the water begins to boil, turn down the heat, cover the pan and simmer the farro for 30 minutes. Drain off any excess water.


Preparation

In a small bowl, whisk together the oil and vinegar. Set aside.

Carefully peel the skin off the beets, and slice into 1/2-inch chunks. Place in a medium bowl. Add in the radishes, fresh herbs and oil and vinegar mixture and toss to combine thoroughly. Add in the feta and toss again. Season with salt and pepper

Best served immediately, still slightly warm or at room temperature.

Enjoy!

(Serves 4 as a main or 6 as a side. Adapted from http://www.bonappetit.com)


Do you ever get a sudden inexplicable craving for a particular dish or flavor? When I get stressed, I start craving pickles (the really crunchy dill kind) and salami–basically anything really strong in flavor. Often sauerkraut or kimchi will do in a bind. I also regularly crave almond flavor, and I’m not talking about the flavor you get from a handful of almonds. I’m talking about that super strong flavor you get from almond extract.

My mom used to make these delectable almond butter cookies using white flour, loads of butter and sugar and almond extract. They were flaky, sweet and super almondy, and while I haven’t attempted to recreate them gluten-free, I’m often nostalgic for that flavor.

I recently discovered some pears in my fruit bowl that had become very ripe, and since they were too ripe to slice into a salad, I thought why not bake them into an almond cake? Who doesn’t love the combination of pears and almonds? The added spices make this version more flavorful and a little more “sophisticated” in case you’re serving it to guests (or leaving it on a friend’s doorstep during the COVID-19 restrictions).

Like most of my recipes, this one is super easy to make. After all, who needs more challenge and stress in their lives right now? You can make this using any variety of pear, but I prefer to use Bartlett or Packam.


Ingredients

1 cup all-purpose gluten-free flour (I like this brand)

1 cup almond flour

1 1/2 tsp baking powder

1 tsp cinnamon

1/4 tsp ground ginger

1/4 tsp ground cloves

1/4 tsp salt

1/2 cup butter, softened or 1/2 cup mild-tasting olive oil

1/2 cup sugar

2 large eggs

1 tsp pure vanilla extract

1 tsp almond extract

3 Tbsp nut milk

2 ripe pears, peeled, quartered and cored, and cut crosswise in 1/4-inch slices


Preparation

Preheat oven to 350F. Lightly grease and flour a standard 8-inch cake pan or springform pan. Cut a piece of parchment paper to fit the bottom.

In a medium size bowl, whisk together the dry ingredients.

In a larger bowl, beat the butter (if using) with a wooden spoon or rubber spatula until its a smooth, even consistency. Beat in the sugar. Beat in the eggs, one at a time, blending well. Add in the extracts and nut milk, and blend. Add the dry ingredients to the wet, and fold in just until blended. Fold in the pear slices. Spoon the batter into the prepared pan and gently smooth the top using the back of a spoon or rubber spatula.

Place in the center of the oven and bake for 55-60 minutes or until a toothpick inserted in the middle comes out clean and the cake has turned golden brown.

Allow the cake to cool completely and serve with a dusting of powdered sugar and a sprinkle of cinnamon.

Enjoy!


Almond Butter Blondies


Call me weird, but I have always preferred blondies over brownies. Don’t get me wrong… I love chocolate, but I like it in small doses, like one or two squares of a high-quality, dark chocolate bar. But something about blondies makes my mouth literally water, and traditional blondies share a lot in common (i.e., butter and sugar) with my favorite sweet flavor–butterscotch.

The blondies of my childhood were essentially white flour, butter and brown sugar (think obesity, type II diabetes, high triglycerides, etc.). So how can I indulge in eating my beloved blondies without putting on 10 pounds, causing my insulin levels to go haywire or just feeling badly for overindulging?

Enter almond-butter blondies. I make mine with very little sugar–which offsets a lot of guilt, and with almond butter and almond flour, so I feel I’m getting something good (i.e., a hefty serving of protein) out of my indulgence. In fact, I generally feel so justified in eating these, that I almost never stop at just one!

These are gluten-free, get a nice “crust” to them, yet retain plenty of gooey, chewy goodness on the inside. My kids are always trying to get me to add in extra chocolate chips or chunks, but it’s actually the non-chocolate part I’m really after. I hope you will give them a try, and tweak the recipe as you wish to fit your sweet and texture preferences.


Ingredients

1/2 cup almond butter

1/4 cup coconut oil, melted

1/3 cup coconut sugar (to make Paleo) or 1/3 cup brown sugar

1 egg

2 tsp pure vanilla extract

1 scant cup almond flour

2 Tbsp tapioca starch

1 tsp baking soda

1/4 generous tsp sea salt

1/3 cup dark chocolate chips, chunks or chopped pecans or walnuts


Preparation

Preheat oven to 350 degrees Fahrenheit. Line an 8×8 baking dish with parchment paper (so there’s no pan to clean up!).

In a small bowl, whisk together all the dry ingredients (except the chocolate chips, chunks or nuts) and set aside. In a medium bowl, whisk the almond butter and sugar until well blended and no lumps are left. Whisk in the vanilla and coconut oil, followed by the egg. Using a rubber spatula, fold in the dry ingredients until blended, then fold in the chocolate chips, chunks or nuts.

Scrape the dough into the prepared pan and carefully smooth the surface using the spatula. Place in the center of the oven and bake for 18-20 minutes or until edges are just slightly brown. (It’s better to underbake slightly instead of overbake so the cookies retain some gooey/chewy quality!)

Allow to cool completely before cutting into 9 or 16 squares depending on whether you want to feel guilty for having more than one at a time.

Enjoy!


Wherever you are on our shared rock, I hope you are safe and healthy!

The challenging times we find ourselves in impact all of us–some of us much more than others. Some of us are without a partner, some of us wish we could be. Some of us are homeschooling children, some of us are teaching children remotely. Many people have lost their jobs, and many more have had to scale back their hours and subsequent pay. All of us are living with some degree of fear and uncertainty. Some of us are lucky to live close to nature so we have an escape from the fear and worry that naturally accompanies times like these, while others are isolated in tiny spaces in densely populated cities.

Our current challenges make us all vulnerable, and can drive people apart–making some desperate to hold on to whatever they have or can get their hands on (e.g., toilet paper). However, I’m personally encouraged by the positive, caring unifying sentiments many have shared or demonstrated. I’ve also been uplifted by all the humor people have shared–cuz’ we can all use a little laughter during times like this.

This time also gives pause not only to think about what’s happening, but why, and theories abound linking COVID-19 to overpopulation, a lack of respect for or understanding of nature, even climate change. Some of those connections are more tenuous, but let’s be honest–we have ravaged and abused our beautiful planet home in many ways, and maybe this is her way of crying out or fighting back. Which is why now, on the 50th anniversary of Earth Day, is as good a time as any to think about how we can reduce our impact on her.

I’ve had people tell me that unless there’s a sector-wide change (e.g., automative, airline, or agricultural industry), or something overarching, like a carbon tax, that it doesn’t really matter what any one of us does or doesn’t do. I couldn’t disagree more. Think about it… Maybe you choose to do just one thing differently. You’re just one person, but then you share what you’re doing with a couple family members or friends, and your comment influences one or two of them to make a change as well. Then they go on to do the same, and the ripple grows wider. What’s more, when we make a healthy change in one area of our lives, it tends to influence other areas as well (i.e., you’re hard-pressed to find someone on a Whole30 diet who exercises regularly and smokes a pack of cigarettes a day).

The decision to make a positive change leads to exponential growth and has exponential benefits.

I’m sure you’ve seen dozens of lists of what you can do to live a little greener, but if you’re like me, every time I read one, I think of something new or I’m reminded of an area I could do better in. Here’s a handful of old, but still impactful ideas:

  1. Consume less – We live in a society of consumerism, which has proven bad for the planet on almost every level. Maybe COVID-19 has helped remind some of us about what matter most–our health, the health of our loved ones, time spent with our loved ones, etc. Making a conscious decision to buy fewer things and/or buy second hand, helps our planet and our pocketbooks. I’m not sure if this is true of where you live, but where I live, second hand shops are popping up everywhere and are “trendy,” and online stores, such as ThredUp, Poshmark, and Tradesy make clothes shopping guilt-free (or at least less guilty).
  2. Buy local – I confess I love the convenience of Amazon Prime, but when I think about all those separate truck deliveries to my house, I cringe–quite literally. Not all, but much of what I buy on Amazon can be bought at a local store in my immediate area, whether it’s a lawn tool or vegetable. Buying local produce is always better for you and the planet. Given the two little bears I have living with me, I used to buy fresh berries all year round, regardless of where they were grown. However, a few years ago, I stayed my hand as it hovered above the blueberries grown in Peru being offered to me two miles from my home. I couldn’t stomach the carbon footprint attached to those berries, and let’s face it, how fresh could they be after traveling that distance?
  3. Use earth-friendly cleaning products – I made this change over a decade ago and admit the effectiveness of some natural, biodegradable products wasn’t great 10+ years ago. However, there are many more choices available today, and most are equally effective as their chemical-laden, toxic counterparts. The one area where natural products lags is in the clothes washing realm. I have found Method laundry projects the most effective out of the natural options, but even if you don’t give up your Tide or Shout, but you switch out everything else, you’ve still done a lot to be kinder to Mother Earth.
  4. Buy organic and sustainable – whether it’s organic produce, organically grown pastured meat or sustainably-made clothing. Growing cotton uses a lot of water, which isn’t great, but if you buy organic cotton clothing or bedding, at least you have helped reduce the amount of toxic pesticides that leach into our soil and groundwater. The same goes with organic produce. And the more of us that buy organic, the more stores will buy from organic farmers, the more farmers will switch to growing organically, and so on and so on.
  5. Leave your car at home – Walking and biking offer so many health benefits–both physical and psychological, and they obviously reduce your impact on the environment. You probably don’t plan to bike to visit a loved one who lives 30 miles away, but biking or walking to get takeout or to dine at your favorite restaurant (post pandemic), and walking or biking to your local movie theater, ice-cream shop or wine bar benefits your health, the health of your community and the health of our planet.

Please join me in honoring our shared rock, our shared home, by committing to make one positive change today. Every one of us can make a difference, and every bit helps.

Be well!


Cook the Beans

inspired by ingredients, smells and Travels, vegan & vegetarian

Cooking Without Limits

Food Photography & Recipes

Selma's Table

Life doesn't have to be perfect to be wonderful - stories and recipes from a wonderful life...