Feeds:
Posts
Comments

Posts Tagged ‘low sugar desserts’

Yes, it’s been ages since I posted any recipes here, but you know, sometimes life gets a little sticky and finding time to post gets tricky. That said, I haven’t stopped cooking (as you know if you follow me on Instagram!), and I now have dozens of recipes I hope to share with you here!

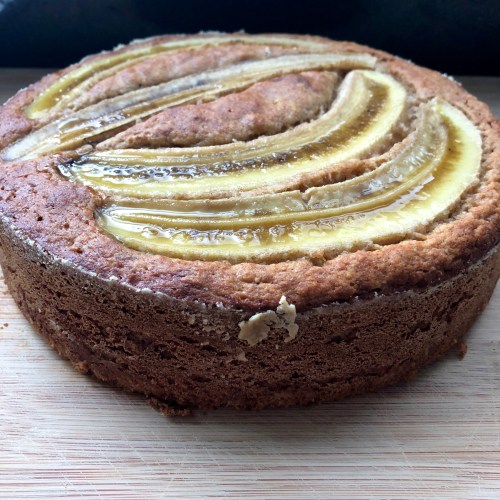
This Apricot Almond Cake fits where I am in my life so perfectly that it provides the perfect re-entry into blogging for me. It is crazy simple to make–both in terms of time and effort, and it’s really delicious, especially if you’re an apricot lover like me. When I say “simple,” I mean you can prepare it in less than 15 minutes (excluding cooking time, of course). It is moist, flavorful and perfect for any occasion.

Like most of my recipes, this cake is also low-sugar, dairy-free and gluten-free. I first made it with canned peaches, because fresh apricots weren’t available at the time, but this cake wants to be made with apricots–trust me!

Ingredients

1 cup gluten-free all-purpose flour*

1/2 cup almond flour

1/3 cup evaporated cane juice

1 1/2 tsp baking powder

1/2 tsp sea salt

2 pasture, free-range eggs

1/2 cup extra virgin olive oil

1/2 cup unsweetened almond milk

1 tsp pure vanilla extract

1/2 tsp almond extract

4-5 small, ripe apricots, cut in half and pitted

1 Tbsp apricot jam

Preparation

Preheat oven to 350F. Grease a 9-inch cake pan with olive oil and line the bottom with a disk of parchment paper. Set aside.

Whisk the dry ingredients together in a small bowl until well-blended.

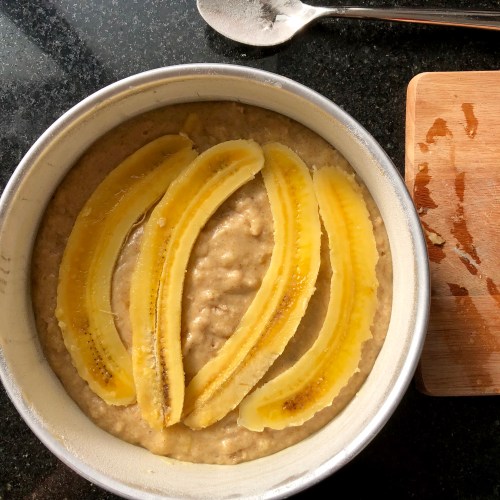
In a medium bowl, whisk the eggs until pale yellow in color. Whisk in the oil, milk and extracts. Stir the dry ingredients into the wet until thoroughly blended. Pour into the prepared cake pan. Arrange the apricot halves, cut side up, in the pan. Place in the center of the oven and cook for 30 minutes.

While the cake is cooking, mix about 1 teaspoon hot water with the apricot jam in a small bowl. After the cake has baked in the oven for 30 minutes, remove it and spread the jam carefully over the top. Return cake to the oven and bake another 15-20 minutes or until a toothpick inserted comes out clean.

Allow cake to cool completely before serving, about 30 minutes.

Enjoy!

Read Full Post »


This cake has become my family’s favorite easy-bake, easy-to-make, cake. It’s essentially banana bread masquerading as banana cake, but the cake shape makes it seem more special. It’s crazy moist, contains very little added sugar (because how much sugar do you need with all those bananas in there?!), and it’s a great way to use ripe and/or spotty bananas. We buy tons of bananas in Brazil because they are super inexpensive. However, I don’t even like raw bananas, so I literally buy 20 bananas a week to use in my Green Paleo Pancakes, Green Power Shake, oatmeal pancakes, breads, cakes and muffins.

I have ordered Bolo de Banana several times in Brazil, and while I’ve always found the cakes here overly sweet (not to mention full of gluten), I like how they incorporate so much banana into their recipes. So I tinkered with my gluten- and dairy-free banana muffin recipe to come up with this recipe. It uses 4-6 bananas, and instead of blending the bananas with the wet ingredients, I only mash the bananas a little with a fork so there are lots of chunks of banana in the final cake. Topping the cake with slices of banana makes the cake look more festive, and the banana caramelizes in the baking making it taste better.


Ingredients

1/2 Tbsp butter or oil

1 scant cup gluten-free all-purpose flour (I like this brand)

1/2 cup plus 1 Tbsp almond flour

1/3 – 1/2 cup sugar*

1 tsp ground cinnamon

3/4 tsp baking powder

1/2 tsp baking soda

1/2 tsp sea salt

1/4 tsp nutmeg

2-4 ripe bananas

1-2 yellow bananas

2 eggs

1/4 cup coconut oil

1/2 cup plant-based milk (I like almond or coconut)

1 tsp pure vanilla extract

*I’ve used as little as 1/4 cup of sugar, and the cake is still delicious!


Preparation

Preheat oven to 350 F (180 C). Grease and flour a standard cake tin. Place the tin on a piece of parchment paper, draw a circle using the base of the tin as a guide, cut out the circle and set it inside on the bottom of the tin. Set aside.

In a small mixing bowl, whisk together the dry ingredients until there are no lumps and everything looks thoroughly combined. Set aside.

Peel the 2-4 ripe bananas and mash with a fork until broken down but still very lumpy in consistency. You need 1-1/2 cups for this recipe, but the recipe is very forgiving if you have slightly less or slightly more. Whisk in the eggs and vanilla. Whisk in the oil and milk. Pour the dry ingredients into the wet ingredients and using a rubber spatula, fold until combined, but do not over stir. (I’ve read and been told that you can’t over stir anything made with gluten-free flour. However, in my personal experience, particular when baking cakes, one should never over stir.) Pour the batter into the prepared tin and give the tin a little jiggle to evenly distribute the batter.

Carefully slice the remaining 1-2 less ripe bananas into strips approximately 3/8-inch in thickness. Depending on the size of your banana(s), you may only need one banana. I aim for three to four strips. Lay the strips on top of the batter, and pop the tin in the center of the oven. Bake for 45-50 minutes or until a toothpick inserted comes out clean.


Enjoy!


Read Full Post »


Hello World! It’s been ages since I’ve posted anything, but for those of you who follow me on Instagram, you know I’m still around–cooking and eating. On top of working my “day job”–empowering communities with renewable energy, I decided to move to Brazil with my husband and children. That’s right, at an age when most people plan to stay put at least until their children have graduated from high school, I am moving to a place I’ve only ever visited once (just last month!). And yes, I do wonder if I’m crazy–regularly, these days. There is an insane amount of work involved in moving to another country, particularly when you’re moving as part of a start-up, not as part of taking a new assignment abroad within a large multi-national corporation (that handles all the nitty gritty details for you). I’ve been filling out pages and pages of paperwork in order for our children to attend school in another country, and trying to declutter a house I had no plans of moving out until two months ago, and packing and sorting, packing and sorting, repeat, repeat again. However, my husband and I have always wanted to live abroad with our children–even for just a year or two. We firmly believe it dramatically helps children become world citizens, not just little privileged beings growing up comfortably in their little American community.

Not surprisingly, I’ve been somewhat stressed out, so for those of you who know me well, you know I’ve been baking up a storm. Nothing fancy–just the usual. Fast and easy, gluten-free muffins or breads. The mixing and stirring relaxes me, and the eating of warm, cake-like bread comforts me–at least for a short while.

This recipe for Coconut Sesame Almond Muffins came about because I’ve also been trying to incorporate more seeds into our food. Seeds, particularly pumpkin, sesame and chia, are so nutritious, but I always feel like a bird eating seeds on their own. Lately, I sprinkle them on every salad, and in this recipe, I bake them in!

These muffins use so little added sugar, but they come out sweet, incredibly moist, and with a cake-like texture (“crumb” as my English friends say). You can whip them up in about 10 minutes plus cooking time, and they keep well stored in an airtight container (once they cool completely) for at least 3 days.


Ingredients

2 eggs

2/3 cup coconut milk

1/4 cup coconut oil

1 tsp vanilla extract

1 cup almond flour

1/2 cup gluten-free all-purpose flour (I like this brand)

1 cup desiccated coconut

1/3 cup cane sugar

1/4 cup white raw sesame seeds

1/2 tsp kosher salt

2 tsp baking powder


Preparation

Heat oven to 350F. Grease a standard, 12-cup muffin pan or line with paper muffin cups.

In a medium bowl, whisk the eggs until even in color. Whisk in the milk, vanilla extract and oil.

In a separate bowl, whisk together all the dry ingredients. Add the wet ingredients to the dry and fold in using a spatula until just blended. Spoon evenly into the muffin pan. Put in the middle of the oven and bake for 20-25 minutes or until muffins have just a hint of gold, and a toothpick inserted in the center comes out clean.

Allow to cool at least 10 minutes.

Enjoy warm or at room temperature (although these are so delicious warm, that you may devour immediately and share the still-warm muffins with friends and neighbors!). Store for up to 3 days in an airtight container.

I love the natural whiteness of these muffins, but for fun, you can fold in 1/4 cup of mini dark chocolate chips before baking.

Enjoy!


SaveSave

Read Full Post »

fig tart1fig tart2fig tart3

I’m a little late posting this, so please forgive me!

Like the orange and beet salad I shared in my last post, this tart is another great dish for transitioning into autumn. Granted, depending on where you live, you may already be deep into autumn. But this dessert is so insanely simple to make and delicious to devour that I couldn’t wait until next summer to share it!

Here in northern California, we’re lucky enough to have access to fresh blueberries nearly year round, and our fig season is at least six months long. If you have access to fresh blueberries and figs where you live, give this tart a try. You can use black mission figs or the more spectacularly colored kadota figs (shown here).

It’s also one of those desserts that makes an al fresco dining experience that much better. And, of course, like many of my the recipes I share, it’s very low in added sugar, so you feel no guilt when you take a second slice after dinner. This dessert relies on the natural sweetness of fresh blueberries and figs.

Use your own tart crust recipe or my gluten-free version (here).


Ingredients

1 1/4 cup gluten-free flour blend*

1 heaping tbsp cane sugar

1/4 tsp sea salt

1/2 cup (1 stick) chilled butter

2-3 tbsp ice water

8 oz marscarpone cheese

2 tbsp raw honey

1 tsp pure vanilla extract

7-8 smallish figs (black mission or kadota), sliced in half

1 cup fresh blueberries

*I like to use 1/2 cup gluten-free all-purpose flour blend, such as Bob’s Red Mill, 1/2 cup arrowroot powder/flour and 1/4 cup almond flour. You can also sub a little buckwheat flour and alter the almond to arrowroot ratio.


Preparation

Heat oven to 375F.

In a medium bowl, whisk the gluten-free flour blend, 1 tbsp sugar and salt until blended. Using a pastry cutter, two knives or whatever technique you like, cut in the flour until it’s evenly incorporate. Sprinkle a tablespoon or two of ice water and continue mixing, adding a little more water if necessary until there is no more dry flour on the bottom of the bowl, but the mixture should still seem quite dry.

Dump the contents into a 9-inch tart pan and press the crumbly mixture into the bottom and sides of the pan, being careful not to work the dough too much (or it will get tough!). Chill in the fridge until the oven is ready.

Bake crust for about 15 minutes or until golden. Place on a rack to cool.

While the crust is cooling, whisk the mascarpone cheese with 1 tbsp of honey and the vanilla until you have a spreadable mixture.

When the crust has cooled enough to touch, carefully spread the mascarpone over the bottom of the crust in an even layer. Top with the fruit–either in a pattern or simply dropped in a haphazard fashion, and drizzle with 1 tbsp honey.

Serve slightly warm or at room temperature.

Enjoy!


fig tart4


Read Full Post »

squash bars abovesquash bars close side


The winter months find me seeking comfort and warmth in every kind of root vegetable. That might sound silly coming from someone who lives in California, where even in the northern half of the state, the temperatures rarely get below 45 degrees even at the coldest part of the night. But I feel cold more often, and I feel as though nature intended us to spend more time indoors, playing games or doing puzzles in front of a roaring fire and eating plenty of soups and roasted things.

My pantry is currently stocked with three kinds of squash, onions, carrots, shallots and lots of sweet potatoes. I think of every excuse to incorporate some deep yellow or orange-colored vegetable into our meals–roast meats and vegetables one night, carrot soup the next, baked sweet potato fries often, etc.

But I can only bake and consume so many pumpkin pies before I begin to feel glutinous. Which is why I was thrilled to see a recipe last month for squash dessert bars.  Naturally sweet and slightly nutty, these bars immediately became our favorites. (Actually, there’s another bar recipe I promise to post soon that we also love, that doesn’t even require cooking.) I hope you like these as much as we do!

Squash walnut crumble bars (recipe adapted from Love & Lemons)


Ingredients

For the crust:

1¼ cups all-purpose flour, regular or gluten-free* (see my mix below)

1¼ cups walnuts, chopped fairly fine

1/4 cup brown sugar

5 tablespoons cold unsalted butter, cut into cubes

2 Tbsp ground flax seed

1/4 teaspoon salt

*I use 1/2 cup GF flour, 1/2 cup sorghum flour,1/4 cup almond flour/meal with great results.

For the squash layer:

1 cup cooked squash puree or mash from buttercup or butternut squash, or sweet potato (avoid canned)

4 tablespoons unsalted butter, melted and cooled slightly

1-2 tablespoons maple syrup

1 teaspoon vanilla

1 teaspoon cinnamon

¼ teaspoon nutmeg

¼ teaspoon salt


Preparation

Preheat oven to 375F degrees.

Note: This step can be done in advance. Cut a buttercup or butternut squash in half and scoop out seeds and anything stringy. Place the squash cut side down on a parchment paper-lined rimmed baking sheet. Using a toothpick, skewer or fork, poke a few holes in the top of the squash halves and roast until you can easily slide a knife or fork in and out, about 45 minutes. Let the squash cool then scoop out the flesh into a bowl, and mash the cooked squash with a fork until the consistency is fairly smooth. Set aside.

squash cutsquash mash

Reduce the oven temperature to 350F.


Line an 8×8-inch baking dish with parchment paper with the paper going up the sides of the dish. Using a pastry cutter and bowl or a food processor on pulse, mix together the flour, walnuts, brown sugar, butter and salt until the mixture resembles coarse crumbs (with some pea-sized). You can add a few drops of water if the mixture seems too dry.

Set aside 1/2 cup of the crumble mixture for the topping.

squash crust mixsquash crust crumb

Dump the rest of the crumble mixture into the baking dish. Using a large, fairly flat spoon or the palm of your hand, firmly and evenly press the crumble mixture into the dish. Bake for 20 minutes or until lightly golden on the edges. Remove from the oven and let cool for 10 minutes.

While the crust is cooling, mash together 1 cup of the squash puree with the butter, maple syrup, cinnamon and salt. Stir until smooth. (Adjust spices to your taste.).


Evenly spread the squash puree over the crust. Evenly sprinkle the remainder of the crumble mixture over the squash layer. Bake an additional 10-12 minutes or until the crust turns lightly golden.

squash spreadsquash crumble top

Chill bars in the fridge for 3-4 hours to set before slicing. To slice, carefully lift two opposite sides of the parchment paper out of the pan. Use a sharp knife to slice bars into nine squares or 2×3-inch rectangles. The bars will keep for 3-4 days in an airtight container in the fridge.

Enjoy!


squash bars close

Read Full Post »

pear tart abovepear tart slice


I panicked the other day when I saw that I had several pears in the fruit bowl, each very ripe or on the verge of turning to brown, mealy mush. I feel badly throwing out food anytime, but particularly when something has gone bad just because I didn’t get around to eating or cooking with it. I quickly used one pear as the base of a smoothie. But what to do with the remaining pears? They wouldn’t last a day longer in the extraordinary heat of the unusually late summer we’re experiencing here in Northern California. And the warm temperatures don’t exactly call for a pear crisp–although fruit crisps are normally one of my favorite things to eat! So I turned once more to the oddly sensible French, and chose to make a pear and almond tart. I love the combination, and what’s more, I love that ripe pears and almonds are naturally very sweet, enabling me to use very little added sugar–less than a third cup in the whole tart!!

Of course, my mother–who was an amazing cook during my childhood, constantly chastises me for cutting too much sugar out of desserts. She must own a sweeter tooth than me, and can immediately tell if I’ve made one of her dishes using only half the sugar called for in the recipe. So when I made this tart, I assumed I would get an earful from her once she tasted it. (And naturally, I had to have her taste it.)

The kids and I finished dinner late, and tucked into the tart–I for one, fully expecting to find it needed more sugar. However, we all loved it as is and promptly had seconds. We jumped in the car to drive a large slice of tart–while the bathtub was filling, to my mother (who conveniently lives quite close).

I didn’t hear the verdict until the next day, but my mother actually called to say she thought the tart was delicious. For added emphasis, she repeated her rendered verdict.

So without further ado, and with the hope you’ll enjoy it just as much as my family…


Ingredients

Crust

1 1/4 cup gluten-free flour blend*

1 heaping tbsp granulated sugar

1/4 tsp sea salt

1/2 cup (1 stick) chilled butter

2-3 tbsp ice water


Frangipane

1/4 cup sugar

1 large egg

A pinch of sea salt

1/2 tsp pure vanilla extract

1/2 tsp almond extract

2/3 cup almond flour (I like Honeyville)

2-3 pears, cored, skin removed, sliced

*I typically use 1/2 cup all-purpose gluten-free flour, 1/2 cup sweet sorghum flour and 1/4 cup almond flour/meal for my all-purpose gluten-free flour blend.


Preparation

Preheat oven to 400F.

In a medium bowl, whisk the gluten-free flour blend, 1 tbsp sugar and salt until blended. Using a pastry cutter, two knives or whatever technique you like, cut in the flour until it’s evenly incorporate. Sprinkle a tablespoon or two of ice water and continue mixing, adding a little more water if necessary until there is no more dry flour on the bottom of the bowl, but the mixture should still seem quite dry.

Dump the contents into a 9-inch tart pan and press the crumbly mixture into the bottom and sides of the pan, being careful not to work the dough too much (or it will get tough!). Chill in the fridge until the oven is ready.

Bake crust for 10-12 minutes until crust is golden. Place on a rack to cool.

pear tart mix


In the meantime, in a separate bowl, use an electric mixer to beat the egg, sugar and salt until pale yellow and creamy. Blend in the two extracts. Slowly blend in the almond flour and mix until just blended. Using a spatula, spread the mixture evenly on the bottom of the cooled tart crust. Arrange the pear slices on top in whatever design you like.

Reduce oven heat to 375F. Bake the tart for another 25-30 minutes or until the frangipane filling is set.

Serve warm or at room temperature.

Dairy-free? You can easily sub coconut oil and/or palm shortening (I love Nutiva’s) for the butter in the crust.

Don’t care about gluten? You can also make the crust using any traditional pastry crust recipe.

Want to make it even richer? Just add 1/4 cup cream to the frangipane mixture.


pear tart slice removed


Enjoy!

Read Full Post »

cashew pudding aboveLooking for a sweet but healthy treat–for yourself or the kids? This creamy, delicious and nutritious pudding whips up in less than 10 minutes! It uses cashews for the base instead of the usual ingredients we think of when we think chocolate chip cookies (e.g., all-purpose flour, eggs, butter, etc.), and relies on banana for the sweetener instead of the usual white sugar/brown sugar combo. Cashews are an excellent source of heart-healthy fats as well as important minerals including magnesium, manganese, copper and phosphorous. My recipe has been slightly modified from Stephanie Eusebi’s Paleo Cookie Dough Pudding.

This pudding has become a favorite of everyone in my family. It’s delicious straight from the blender or after it’s been chilled in the refrigerator for an hour. It keeps well for several days in an airtight container in the refrigerator. It does require a very high-powered blender, such as a Vitamix. If you just use a regular blender, the cashews won’t blend down into a creamy enough consistency.

cashew pudding close

Ingredients

3/4 cup raw cashews (preferably soaked overnight in 3 cups water and 1/2 tsp salt)

2 tbsp coconut oil, melted

2 tbsp almond butter

1 ripe banana*

3 tbsp water

2 tsp pure vanilla extract

1-2 tbsp maple syrup

1/4 tsp ground cinnamon, optional

1/4 tsp salt

1/4 cup Enjoy Life vegan chocolate chips

*Since there is so little added sugar, it’s important to use a ripe banana. It also makes blending easier.

Preparation

Easy peasy! Put everything but the chocolate chips in a Vitamix or other high-powered blender. Blend until completely smooth and creamy. Scrape out into a bowl and stir in the chocolate chips. Makes approximately 2 cups.

Enjoy!

Read Full Post »

Cook the Beans

inspired by ingredients, smells and Travels, vegan & vegetarian

Cooking Without Limits

Food Photography & Recipes

Selma's Table

Life doesn't have to be perfect to be wonderful - stories and recipes from a wonderful life...