Feeds:
Posts
Comments

Archive for the ‘Desserts’ Category

carrot above2carrot closecarrot container


Who doesn’t love carrot cake?! But let’s be honest… The average carrot cake recipe is loaded with sugar. In fact, most carrot cake recipes contain more sugar than nearly any other type of cake, including my personal favorites–red velvet and tres leches!

One day, I will manage to construct a carrot cake that tastes delicious, has great texture and isn’t loaded with sugar (and maybe uses whipped coconut cream for the frosting instead of cream cheese and sugar!). When that day comes, I will be sure to take lots of photos of the creation (i.e., notable accomplishment), and share the recipe. But until that day comes, these little bites will do a nice job of reminding you of carrot cake, and hopefully satisfy any cravings. They taste remarkably like  carrot cake and what’s more, these little bites contain only good stuff that fuels your body.

My kids love these bites, and they make a perfect afternoon snack for hungry tummies.

This recipe is slightly modified from from the wonderful One Sweet Mess. I tweaked a few measurements to my liking, and omitted the pineapple since the food sensitivity test I took last year informed me I don’t tolerate pineapple well.


Ingredients

2/3 cup grated carrot

1/3 cup oats

1/3 cup  coconut flakes

2 tbsp ground flaxseed

1 tsp ground cinnamon

1/2 tsp ground ginger

Pinch sea salt

1 tsp raw honey

4 Medjool dates, pitted

1/2 cup pecans, finely chopped

1 tsp vanilla extract

3/4 cup fine coconut flakes

Note: I didn’t make the bites photographed here using raisins, but they work well, too, and can be substituted for the dates (1/2 cup).


carrot shred


Preparation

In a food processor, pulse together the carrot, oats, flaxseed and spices. Add in the remaining ingredients (except for the 3/4 cup coconut flakes) and pulse until thoroughly combined.

carrot mix

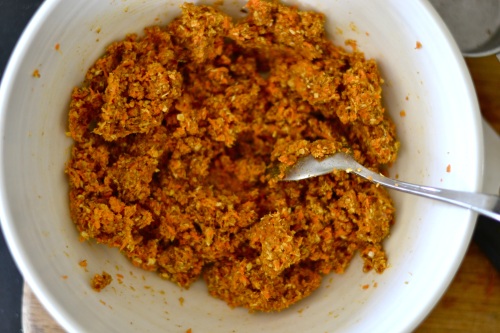
Using your fingers or a teaspoon, scoop out enough of the mixture to roll into an approximately 1-inch diameter ball. Roll the ball in the coconut flakes until coated. Finish the remaining mixture using the same process. Store the balls in an airtight container in the refrigerator.

Serve cold. (I’m adding this comment post-publishing… These need to be served cold–straight from the frig. They are not nearly as good if they’re at room temperature, or worse–warm.) Keeps for 3-4 days in the frig.


Enjoy!


carrot above

Read Full Post »

oat aboveoat close


I apologize that I haven’t posted anything in nearly two weeks… Sometimes life just gets in the way, as I’m sure you’ve experienced. I also go through periods of what I think of as “food homeostasis”–where I’m not trying many new dishes or experimenting with recipes, and I want, and hence cook, the same 5-7 dishes for a week or two. This typically occurs when I’m trying to stick to a restrictive diet (e.g., no gluten, Paleo, no sugar) or when I have loads of work to do and want the comfort and consistency of my standby meals.

But all that aside, over the past few weeks, cravings for butterscotch and caramel flavors keep sneaking into my head. Of course, there’s nothing healthy about butter and brown sugar, so I’ve been pushing the cravings down as best I can. But at some point, I determined that the cravings were a good excuse to make a healthier-than-normal version of British flapjacks.

During the years I spent living in London, flapjacks were one of my on-the-go treats. I suppose the high content of oats made me feel as though I wasn’t being too naughty, but really, it was just the terribly naughty butter and brown sugar combination that lured me.

So here is a somewhat healthier version of the traditional flapjack. It still relies on butter and brown sugar to make the butterscotch flavor, but this recipe doesn’t use a ton of sugar, and it contains nuts and ground flaxseed to boost it’s nutritional content.


Ingredients

1 stick (1/2 cup) butter*

1/3 cup brown sugar (not packed)

1/4 cup coconut nectar

2 cups quick cooking gluten-free oats

1/2 cup walnuts or pecans, finely chopped

1/4 tsp salt

1/2 tsp pure vanilla extract

1/4 tsp ground cinnamon

1/8 tsp ground cardamon

1/3 cup ground flaxseed

*I haven’t yet tried making these with coconut oil, but plan to shortly. I don’t think a straight substitution would work; it would probably require slightly less than 1/2 cup.


Preparation

Heat the oven to 350F.

Line an 8×8-inch baking dish with parchment paper.

In a medium-size saucepan, melt the butter on medium-low heat. Once the butter has melted, stir in the brown sugar, coconut nectar, salt and vanilla. Stir until everything has melted and blended. Stir in the remaining ingredients and mix until thoroughly combined.

oat mixoat press


Spoon out into the baking dish, and spread evenly. Pat down with the back of a large, fairly flat spoon. (I use one of my large serving spoons.) Place in the oven and bake for 23-25 minutes or until golden brown on the edges.

Allow to cool for 20 minutes before cutting in quarters, then cut each quarter diagonally for the traditional triangle-shaped flapjack.


Enjoy!

Read Full Post »

orange above2orange sideWith fruit trees blossoming everywhere, I set my mind on the idea of a simple orange almond cake that holds the promise of summer and tastes as delicious as it smells.

It’s been easier said than done. I have been playing around with it the past few weeks, but my first attempts just didn’t turn out as I envisioned.

Making an orange-flavored cake is ridiculously easy. For the most part, you just add lots of orange zest and use orange juice in place of whatever liquid your recipe calls for. However, making a orange flavored cake using almond flour turned out to be a tad tricky.

If you Google “orange almond cake,” the majority of recipes instruct you to use two whole oranges, boiled then pureed, and a ton of sugar to offset the bitterness of all that pith you now have from using two unpeeled oranges. Seeing as I’m fairly averse to sugar, I set out to create a recipe that still uses a whole orange, and almond flour as its base, without requiring 1+ cups of sugar.

Try this cake. It received rave reviews from friends at our dinner party last weekend, and it’s so simple to make a child can do it–or at least help you make it!

If you’re celebrating Easter this Sunday, this cake would work for brunch, tea or dessert.

I use a little sorghum flour in my recipe, but you can easily make this cake Paleo by using all almond flour or a little coconut flour in place of the sorghum. Serve slices of cake with vanilla ice cream or a fat dollop of plain Greek yogurt. My preference is the later, because Greek-style yogurt is so wonderfully thick, rich and creamy that it balances nicely with the dense, moist orangeness of the cake.


orange slice

Ingredients

2 organic oranges, washed and dried

2 cups almond flour (I like Honeyville)

1/2 cup rice or sorghum flour

1 (generous) tsp baking powder

1/2 tsp sea salt

3 eggs

1/2 cup honey

1/4 cup coconut, olive or macadamia nut oil*

1 tsp pure vanilla extract

2 tbsp cane sugar

*Olive oil makes this cake feel like more of a tea cake, while macadamia nut and coconut oil sweeten it slightly.


Preparation

Place one orange in a saucepan, cover with water, bring to a boil and simmer, covered, for 2 hours. Allow to cool. Remove the orange, slice and remove any seeds and puree the orange, skin and all. Set aside and reserve the cooking liquid.

Preheat oven to 350F.

Grease a 9-inch springform cake pan or regular 9-inch cake pan if you don’t have a spring-form. I also like to cut out a disk of parchment paper to lay on the bottom, but it’s not essential. It just makes it easier to remove your slices when you’re ready to serve.

In a large bowl, beat the eggs until they’re pale yellow. (I use a large metal whisk for this part.) Whisk in the honey, oil, vanilla and orange puree. Remove the zest from the non-cooked orange and whisk into the egg mixture. Juice the now “zestless” orange. You should get about 1/3-1/2 cup juice depending on the size and ripeness of your orange. Set the juice aside.

Work in progress with orange zest getting everywhere.

Work in progress with orange zest getting everywhere.

Cake batter in pan ready for the oven.

Cake batter in pan ready for the oven.

In a medium bowl, whisk together the flours, baking powder and salt. Stir the dry mixture into the egg mixture until combined. Note: Since this cake is gluten-free, you theoretically shouldn’t have to worry about over-mixing, but since I think over-mixing is the number 1 killer of any cake, please mix until just combined. Pour out into the prepared pan, place in the center of your oven and cook for 50-55 minutes or until a toothpick inserted in the center comes out cleanly.

While the cake is cooking, put the 2 tbsp of sugar and orange juice, along with a 1/4-1/2 cup of the liquid the orange was cooked in, in a small saucepan and heat to boiling. Reduce the heat to simmer, and cook for 15-20 minutes, stirring occasionally, until the liquid is reduced by at about half. Remove from heat and let it cool until the cake is finished baking. It should become thick and syrupy as it cools.

When the cake is done baking, remove it from the oven. Use a toothpick to poke a few holes in the top middle section, and carefully spoon the thickened orange juice mixture over the top. Allow the cake to cool in the pan for two hours.

Cake fresh from the oven unglazed.

Cake fresh from the oven unglazed.

Cake glazed and ready to cool for a few hours.

Cake glazed and ready to cool for a few hours.

Serve at room temperature with a scoop of vanilla ice cream or a big dollop of plain Greek yogurt.


Enjoy!


orange above 


Read Full Post »

pistach above

Continuing the green theme–since Saint Patrick’s Day may have come and gone, but Spring still charges on in all its budding glory. Here’s a super simple, instant and guilt-free ice”cream.” It’s just a variation of one of my previous posts where I used frozen bananas and berries as the base.

If you’re an ice cream lover, like me, and if you also happen to be lactose intolerant (like me!) or vegan, I think you’ll appreciate the immediate gratification of throwing in a handful of ingredients, flipping the “on” switch and a minute later getting to enjoy a cold, creamy, nutritious “dessert”!


Ingredients*

1/2 cup coconut milk (regular NOT lite!)

3/4 cup unsalted, shelled pistachios

1/3 cup unsalted raw cashews

1-2 tbsp raw honey

1/4 tsp almond extract

5-6 ice cubes

*Note: The measurements aren’t exact because coconut milks vary widely in thickness and richness. My favorite is Native Forest. It’s organic and comes in BPA-free cans.


pistach close

Preparation

Put everything into a high-powered blender, such as a VitaMix, and blend until creamy. Adjust the consistency if necessary by adding more cashews. Note: You may need to use the plunger if some of the ingredients stick to the sides.

If you want a thicker, richer version, you can freeze the contents of a can of coconut milk in an ice cube tray and use about half the cubes in place of the liquid coconut milk and regular ice cubes.

Serve immediately.


Enjoy!


pistach sunny


Read Full Post »

choc closechoc above

These chocolatey, oaty bars make a great afternoon treat. They’re packed full of fiber (from the oats), protein and heart-healthy fats (from the nuts and nut butter) and antioxidants from the dark chocolate.

Yes, you must think about them in advance since they require several hours to set, but they’re a cinch to make and don’t require baking. They’re sweeter made with dates, but raisins make the preparation that much easier. Try it both ways!


Ingredients

1 cup almond butter

1/4-1/3 cup honey (depending on how dark your chocolate is)

1 stick unsalted butter, melted, or 3/4 cup coconut oil, melted

2 cups old-fashioned rolled oats

1/2 cup toasted almonds, roughly chopped

6 oz bittersweet chocolate (use at least 65% dark cocoa), roughly chopped

3/4 raisins (or pitted, chopped dates, since I know many people hate raisins)

1/4 tsp coarse-ground salt


choc chopchoc almonds


Preparation

Line an 8-inch square baking dish with parchment paper leaving a little overhang (enough to grab onto).

Melt the almond butter, honey and butter (or coconut oil) in a saucepan over medium heat, stirring frequently.

choc mix

Remove from heat and add in the chocolate pieces, stirring until the chocolate has melted completely. Stir in the remaining ingredients and mix well until everything is evenly incorporated.

choc mix 2

Pour the mixture into the prepared pan and spread evenly using the back of a large spoon.

choc pan

Refrigerate until the bars harden, at least 3 hours and up to 1 day. Gently tug and lift the edges of the parchment paper to remove the block of chilled “dough” from the pan and transfer to a cutting board. Cut into bars. Store in the refrigerator up to 3 days.


Enjoy!

choc stacked

Read Full Post »

squash bars abovesquash bars close side


The winter months find me seeking comfort and warmth in every kind of root vegetable. That might sound silly coming from someone who lives in California, where even in the northern half of the state, the temperatures rarely get below 45 degrees even at the coldest part of the night. But I feel cold more often, and I feel as though nature intended us to spend more time indoors, playing games or doing puzzles in front of a roaring fire and eating plenty of soups and roasted things.

My pantry is currently stocked with three kinds of squash, onions, carrots, shallots and lots of sweet potatoes. I think of every excuse to incorporate some deep yellow or orange-colored vegetable into our meals–roast meats and vegetables one night, carrot soup the next, baked sweet potato fries often, etc.

But I can only bake and consume so many pumpkin pies before I begin to feel glutinous. Which is why I was thrilled to see a recipe last month for squash dessert bars.  Naturally sweet and slightly nutty, these bars immediately became our favorites. (Actually, there’s another bar recipe I promise to post soon that we also love, that doesn’t even require cooking.) I hope you like these as much as we do!

Squash walnut crumble bars (recipe adapted from Love & Lemons)


Ingredients

For the crust:

1¼ cups all-purpose flour, regular or gluten-free* (see my mix below)

1¼ cups walnuts, chopped fairly fine

1/4 cup brown sugar

5 tablespoons cold unsalted butter, cut into cubes

2 Tbsp ground flax seed

1/4 teaspoon salt

*I use 1/2 cup GF flour, 1/2 cup sorghum flour,1/4 cup almond flour/meal with great results.

For the squash layer:

1 cup cooked squash puree or mash from buttercup or butternut squash, or sweet potato (avoid canned)

4 tablespoons unsalted butter, melted and cooled slightly

1-2 tablespoons maple syrup

1 teaspoon vanilla

1 teaspoon cinnamon

¼ teaspoon nutmeg

¼ teaspoon salt


Preparation

Preheat oven to 375F degrees.

Note: This step can be done in advance. Cut a buttercup or butternut squash in half and scoop out seeds and anything stringy. Place the squash cut side down on a parchment paper-lined rimmed baking sheet. Using a toothpick, skewer or fork, poke a few holes in the top of the squash halves and roast until you can easily slide a knife or fork in and out, about 45 minutes. Let the squash cool then scoop out the flesh into a bowl, and mash the cooked squash with a fork until the consistency is fairly smooth. Set aside.

squash cutsquash mash

Reduce the oven temperature to 350F.


Line an 8×8-inch baking dish with parchment paper with the paper going up the sides of the dish. Using a pastry cutter and bowl or a food processor on pulse, mix together the flour, walnuts, brown sugar, butter and salt until the mixture resembles coarse crumbs (with some pea-sized). You can add a few drops of water if the mixture seems too dry.

Set aside 1/2 cup of the crumble mixture for the topping.

squash crust mixsquash crust crumb

Dump the rest of the crumble mixture into the baking dish. Using a large, fairly flat spoon or the palm of your hand, firmly and evenly press the crumble mixture into the dish. Bake for 20 minutes or until lightly golden on the edges. Remove from the oven and let cool for 10 minutes.

While the crust is cooling, mash together 1 cup of the squash puree with the butter, maple syrup, cinnamon and salt. Stir until smooth. (Adjust spices to your taste.).


Evenly spread the squash puree over the crust. Evenly sprinkle the remainder of the crumble mixture over the squash layer. Bake an additional 10-12 minutes or until the crust turns lightly golden.

squash spreadsquash crumble top

Chill bars in the fridge for 3-4 hours to set before slicing. To slice, carefully lift two opposite sides of the parchment paper out of the pan. Use a sharp knife to slice bars into nine squares or 2×3-inch rectangles. The bars will keep for 3-4 days in an airtight container in the fridge.

Enjoy!


squash bars close

Read Full Post »

gello orangegello red above2


Do you remember eating finger Jello during your childhood? I loved the stuff, and despite the fact that my mother normally fed us healthy food, she seemed to think the benefits of Jello outweighed all the white refined sugar and food coloring it contained. We would regularly make finger Jello as a snack or treat, and on special occasions, particularly holidays, she would make a pretty layered dish with green Jello. This dish was eaten with relish by even the most sophisticated foodies in our lives during that time. One layer contained sliced pears in the green translucence, the other had cream cheese blended in, which made a dreamy pale green color. And my mother always added a few drops of peppermint extract, so the whole dish had a wonderfully light, minty taste.

Several decades passed by in which flavored, colored Jello did not make an appearance. But I did think fondly of it from time to time. Then I started making my own coconut milk yogurt, and found that natural, unflavored, unsweetened gelatin thickened my yogurt nicely. Seeing that creamy, slightly gelled thick yogurt got me thinking more and more about the beloved finger Jello of my childhood. On a side note, I have also been making bone broth regularly–not stock from leftover bones that you use as a soup base, but specifically broth from gelatinous bones that I order and buy from the local farmers market. It is quite gelatinous once it’s cooled, and I swear it has greatly improved my overall digestion and well being. (I will speak about all the virtues of bone broth in another posting.)

gello containersSometimes, I forget to place my order for gelatinous bones, and the farmer sells out before I arrive at the market. This made me wonder if I could find an off-the-shelf product. Luckily, I quickly discovered a great product, Great Lakes Gelatin, derived from pastured animals. It comes in two forms, regular unflavored gelatin and “Collagen Hydrolysate.” Gelatin is an excellent source of protein, boasting 6 grams per tablespoon with zero carbohydrates. The hydrolyzed version is intended to help regulate your body’s metabolism by giving you pure protein that is easily absorbed by the body. (It can be used as a weight loss aid.)  It’s the same collagen found naturally in the bones, skin and cartilage of animals, and is thought to lubricate joints and help build connective tissue. By age 25, our bodies begin losing the ability to repair supporting connective tissue (and we begin to see those annoying wrinkles forming). Natural gelatin is also chock full of amino acids like lysine, glycine and proline which the body needs to regulate cell function.

Growing up, my fingernails were as tough as, well, nails–the carpentry kind. I could pick things off, pull things apart, scrape things up and generally do anything with my fingernails without a chip or split. However, in recent years, I noticed my fingernails becoming more brittle. If I accidentally jammed one into the car door, the door won. If I picked a sticker off my kids’ dresser using my nails, one or two might chip a little, and my nails generally seemed thinner.

I report with glee that I’ve been using the natural gelatins for a couple of months now, and my nails are, once again, nearly indestructible! Of course, I’m also waiting to see if some of my wrinkles fade away, but that might be wishful thinking. I also expect my hair will grow thicker, although I might not notice it for some time.

I use the natural gelatin in the red container for making yogurt and finger “gello” or gelatin dessert, and I use the hydrolyzed version in my smoothies (it dissolves easily in cold water). I love that I can make something for me and my family that is fun to eat, feels like a dessert but yet contains no sugar except what’s naturally in fruits and their juices. And the possibilities are endless… I recently made coconut finger gello using my favorite coconut milk. It’s delicious with fresh berries on top.

gello orange closegello red above


Ingredients for basic “gello”

1/4 cup cold water

2 rounded tbsp natural gelatin*

1/4 cup hot water (near boiling)

1 1/2 cups fruit juice

1 cup berries or chopped fruit, such as pear

*Use more if you want your “gello” really firm and easily held in the hand


Preparation

Arrange the cut fruit or berries on the bottom of an 8×8-inch pyrex or ceramic square pan.

In a medium bowl, pour in the cold water. Sprinkle the powdered gelatin evenly over the water and allow to “bloom” for about 10 minutes. Whisk in the hot water until all the gelatin is dissolved. Whisk in the juice. Pour the mixture over the fruit, cover the pan with plastic film wrap and chill in the refrigerator for 2-3 hours or until fully set. Cut into squares when ready to serve.


Variations

Coconut finger “gello” – Skip the fruit and juice and whisk in one can of coconut milk along with 1-2 tbsp maple syrup.

Pureed fruit “gello” – Puree fruit in a high-powered blender until smooth and use approximately 3 cups in place of the juice and chopped fruit. I used ripe persimmons (peeled and cored) from our tree!


Enjoy!
 

gello orange abovegello red close


Read Full Post »

pear tart abovepear tart slice


I panicked the other day when I saw that I had several pears in the fruit bowl, each very ripe or on the verge of turning to brown, mealy mush. I feel badly throwing out food anytime, but particularly when something has gone bad just because I didn’t get around to eating or cooking with it. I quickly used one pear as the base of a smoothie. But what to do with the remaining pears? They wouldn’t last a day longer in the extraordinary heat of the unusually late summer we’re experiencing here in Northern California. And the warm temperatures don’t exactly call for a pear crisp–although fruit crisps are normally one of my favorite things to eat! So I turned once more to the oddly sensible French, and chose to make a pear and almond tart. I love the combination, and what’s more, I love that ripe pears and almonds are naturally very sweet, enabling me to use very little added sugar–less than a third cup in the whole tart!!

Of course, my mother–who was an amazing cook during my childhood, constantly chastises me for cutting too much sugar out of desserts. She must own a sweeter tooth than me, and can immediately tell if I’ve made one of her dishes using only half the sugar called for in the recipe. So when I made this tart, I assumed I would get an earful from her once she tasted it. (And naturally, I had to have her taste it.)

The kids and I finished dinner late, and tucked into the tart–I for one, fully expecting to find it needed more sugar. However, we all loved it as is and promptly had seconds. We jumped in the car to drive a large slice of tart–while the bathtub was filling, to my mother (who conveniently lives quite close).

I didn’t hear the verdict until the next day, but my mother actually called to say she thought the tart was delicious. For added emphasis, she repeated her rendered verdict.

So without further ado, and with the hope you’ll enjoy it just as much as my family…


Ingredients

Crust

1 1/4 cup gluten-free flour blend*

1 heaping tbsp granulated sugar

1/4 tsp sea salt

1/2 cup (1 stick) chilled butter

2-3 tbsp ice water


Frangipane

1/4 cup sugar

1 large egg

A pinch of sea salt

1/2 tsp pure vanilla extract

1/2 tsp almond extract

2/3 cup almond flour (I like Honeyville)

2-3 pears, cored, skin removed, sliced

*I typically use 1/2 cup all-purpose gluten-free flour, 1/2 cup sweet sorghum flour and 1/4 cup almond flour/meal for my all-purpose gluten-free flour blend.


Preparation

Preheat oven to 400F.

In a medium bowl, whisk the gluten-free flour blend, 1 tbsp sugar and salt until blended. Using a pastry cutter, two knives or whatever technique you like, cut in the flour until it’s evenly incorporate. Sprinkle a tablespoon or two of ice water and continue mixing, adding a little more water if necessary until there is no more dry flour on the bottom of the bowl, but the mixture should still seem quite dry.

Dump the contents into a 9-inch tart pan and press the crumbly mixture into the bottom and sides of the pan, being careful not to work the dough too much (or it will get tough!). Chill in the fridge until the oven is ready.

Bake crust for 10-12 minutes until crust is golden. Place on a rack to cool.

pear tart mix


In the meantime, in a separate bowl, use an electric mixer to beat the egg, sugar and salt until pale yellow and creamy. Blend in the two extracts. Slowly blend in the almond flour and mix until just blended. Using a spatula, spread the mixture evenly on the bottom of the cooled tart crust. Arrange the pear slices on top in whatever design you like.

Reduce oven heat to 375F. Bake the tart for another 25-30 minutes or until the frangipane filling is set.

Serve warm or at room temperature.

Dairy-free? You can easily sub coconut oil and/or palm shortening (I love Nutiva’s) for the butter in the crust.

Don’t care about gluten? You can also make the crust using any traditional pastry crust recipe.

Want to make it even richer? Just add 1/4 cup cream to the frangipane mixture.


pear tart slice removed


Enjoy!

Read Full Post »

olive cake topolive cake slice side

Yes, this is another olive oil cake, but it actually was the first I ever baked, and still remains a favorite of mine and many of our friends.

It boasts a surprising combination of flavors with the fresh rosemary, dark chocolate and olive oil all prominent, and it bakes to a perfect golden brown every time. And like most olive oil cakes, it’s wonderfully moist. It’s also the type of cake you could serve with afternoon tea or after dinner. It keeps well for 2 to 3 days, so it’s also a great choice for a picnic where you want to make something in advance that doesn’t need to be served warm. In fact, even though I love serving it warm after an evening meal, the flavors are more balanced when after the cake has cooled to room temperature.


Ingredients

1 cup whole-grain spelt flour

1 1/4 cup all-purpose flour

1/2 cup sugar

1 1/2 tsp baking powder

3/4 tsp sea alt

3 large eggs at room temperature

1 cup extra-virgin olive oil, plus extra for the pan

3/4 cup whole milk*

1 1/2 tbsp fresh rosemary, finely chopped

3.5 oz dark chocolate (65-70% cacao), chopped roughly into 1/4-1/2-inch pieces

*I haven’t tried making this dairy-free, but I think you could easily substitute coconut or almond milk for cow’s milk.

olive cake choc cop


Preparation

Preheat the oven to 350F.

Rub a 9 1/2-inch fluted tart pan with olive oil. Set aside.

In a medium-size bowl, whisk the dry ingredients together until thoroughly blended. Set aside.

In a large bowl, whisk the eggs until slightly frothy. Whisk in the olive oil, milk and rosemary until well blended. Using a spatula, fold the dry ingredients into the wet and mix until just combined. Do not overmix! Fold in the chocolate pieces. Pour the batter into the tart pan, spreading it evenly and smoothing the top with the spatula.

Bake in the center of the oven for about 40 minutes, or until the top is slightly domed and golden brown with darker edges, and a wooden toothpick inserted in the center comes out clean.


Enjoy!


olive cake sideolive cake slice top


Read Full Post »

grapes abovegrapes close

If you happened to see my last post, you know that my family and I just recently returned from a week-long holiday in France–Provence to be precise. With its hilltop villages crowned with medieval castles, lush vineyards and silvery-leafed olive orchards, the imagery seduced us all over again, and once again, made a lasting impression (the first lasted 13 years). So I think it’s only natural that I’ve been trying to capture and bottle the experience and sensations by cooking as if I’m still in Provence–even though I’m back home in Northern California. Most of the Provence-inspired dishes have been a huge success, but I’m still fine-tuning.

Wanting desperately to replicate our recent experience, my husband and I dragged our jet-lagged children to three different kitchen and cookware shops in search of the small, enameled cast-iron tureens in which our fish was cooked and served to us in Provence. We nearly jumped for joy when we found the perfect-sized tureens at Williams-Sonoma. They’re made by Le Creuset, which is very pricey, but we were in luck since the small tureens we found were 60% off. The night we brought them home, I prepared a simple yellow rockfish in a Provencal sauce (tomatoes, fresh herbs, garlic, saffron, etc.). It was delicious, and the sauce was equally good to what we experienced in Provence. However, in France, they used red mullet, which if you’re not familiar with it, is a small pinkish-red fish with tender, sweet flesh. Sadly, it’s not available where we live, and the rockfish was a less than ideal substitution. I plan to make the same dish in the next week or two using monkfish. It’s so delicious, I will take the time to note my ingredients and measurements so I can share the recipe.

Of course, driving through the famous wine region of Chateauneuf-du-Pape made me want to find a way to pay homage to the humble grape. I’m always surprised how many varieties of grape you can find at even the most basic, mainstream grocery stores–at least here in the Bay Area. But I tend only to buy grapes as a snack food for the children or to serve on a fruit platter for a brunch gathering. However, years ago I bought the cookbook, “Patricia Wells At Home In Provence.” I’ve cooked a few dishes from it, and they’ve all been excellent and relatively simple. I cracked it open upon returning from France and found the perfect recipe using grapes. I’ve modified it just slightly here.


Ingredients

2 large eggs at room temperature

1/2 cup evaporated cane juice

2 tbsp unsalted butter, melted

1/4 cup plus 2 tbsp extra-virgin olive oil (or omit the butter and use 1/2 cup olive oil)

1/3 cup whole milk

1/2 tsp pure vanilla extract

1 cup all-purpose flour

1/2 cup spelt flour

3/4 tsp baking powder

1/2 tsp sea salt

Grated zest of 1 lemon

1/2 tsp almond extract (or grated zest of 1 orange)

10 oz (about 1 1/2 cups) small, purple grapes*

Confectioners sugar for garnish (optional)

*If you live in Provence, you have access to many different varieties of grapes for wine making, which you could use for this cake. However, in most other places, you’ll be limited to a few varieties suitable for cake making. I used Thomcord seedless–smaller and sweeter than plain red grapes, and they worked beautifully.


Preparation

Preheat oven to 350F.

Butter and flour a 9-inch springform pan. Set aside.

Using an electric mixer, beat the eggs and sugar until thick and pale yellow in color, about 3 minutes. Add the butter, oil, milk, vanilla extract and almond extract, if using, and mix until blended.

In a medium-size bowl, mix the flour, baking powder and salt until thoroughly blended. Add the lemon and orange (if using) zest, and toss to coat. Add the flour mixture to the wet ingredients and stir until blended. Set aside for 10 minutes to allow the flour to absorb the liquids.

Stir 1 cup of the grapes into the batter. Spoon the batter into the prepared cake pan and smooth out the top using a spatula or back of a spoon.

Place the pan in the center of the oven and bake for 15 minutes before sprinkling the remaining grapes over the top of the cake. Bake for an additional 35-40 minutes or until the cake feels firm when pressed with a fingertip.

grape baking

Let cool on a rack for 10 minutes. Run a knife along the sides before releasing the removing the side of the springform pan. Serve at room temperature with a sprinkle of confectioners sugar.

Vive le Provence!

grapes sidegrapes


Read Full Post »

« Newer Posts - Older Posts »

Cooking Without Limits

Food Photography & Recipes

Selma's Table

Life doesn't have to be perfect to be wonderful - stories and recipes from a wonderful life...