Feeds:
Posts
Comments

Posts Tagged ‘easy dinners’

soba abovesoba close


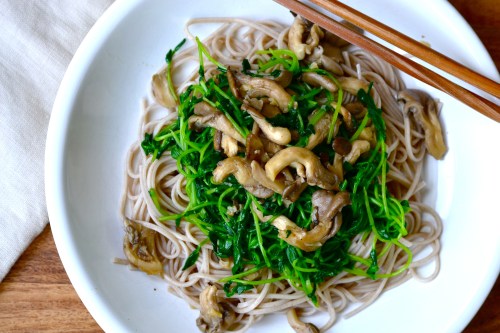
I love dishes like this that contain only a handful of ingredients and can be made using one pan.

Despite how simple this dish looks, it contains a wonderful mix of flavors and textures, and it’s plenty nutritious and filling. You can also alter this dish in a variety of ways if you want to create a more substantial meal or simply for looks. I’ve made a few suggestions below.

I made this dish last week for lunch, and planned to eat the remaining portion the next day. But it was so delicious, I devoured the second portion for dinner that same day.

soba ingredients


Ingredients

1 tbsp avocado oil (or other mild-flavored oil)

2 cloves garlic, finely minced

3/4 cup chicken or vegetable stock

6 oz mushrooms*

4 oz pea shoots

1 package soba noodles

Sea salt and fresh-ground pepper to taste

1 tsp toasted sesame oil

1 generous pinch red pepper flakes (optional)

*I like to use tree oyster mushrooms because I can buy them very local, and they have a wonderfully silky but firm texture. Shitake would also work well. Using white button or cremini will take away from the texture and Asian-inspired flavors of this dish.


Preparation

Bring a pot of water to boil, and cook the soba noodles per their instructions. (The brand I buy cook for 4 minutes.) Drain and rinse repeatedly with cold water until the noodles are no longer warm to the touch. Set aside.

While the water for the noodles is heating up, heat the avocado oil in a 12-inch cast-iron or other skillet over medium heat. Add the garlic, and cook, stirring occasionally until tender and fragrant–about 2-3 minutes. Add in the stock and cook for 5-7 minutes or until the stock reduces by half. (You may want to turn up the heat here to medium-high.)

Add in the mushrooms and cook until very tender, 4-5 minutes. Add in the pea shoots and cook until just tender and bright green. Season with salt and pepper. Toss the vegetable/mushroom mixture with the noodles making sure to include any left over juices, too. Drizzle the sesame oil, sprinkle on the red pepper flakes if using, and serve immediately.

Note: If you want to add more protein, consider adding sauteed prawns or fresh crab–both are delicate enough that they won’t overpower the delicious but light flavor of the pea shoots.


Enjoy!

Advertisement

Read Full Post »

rice aboverice close

OK, so you might think from the photo that this post will share a taco recipe. It’s true, I make some sort of taco every week for my family. They love them, no matter what I stuff in them–prawns, beef, chicken, fish, etc.) You might also think using superlatives such as “best” is a bad idea, but this really is the best Mexican rice I’ve ever had–at least compared with what we call “Mexican rice” here in the United States and all the way down to Central Mexico.

The recipe (slightly modified) comes from Maui Taco, on the island of Maui where my mom was born and raised. Even though it’s grown more crowded and touristy, I still love visiting the island, and I try to go as often as i can. Even though the roads sport more cars, and my favorite “secret” (known only by locals) snorkeling spot now has a resort built to the edge of the sand, the waters are still turquoise blue and warm, and I still know where to go for a guaranteed swim with huge gentle sea turtles.

But back to the food! After a few hours of snorkeling and playing in the surf and sand, my family heads to Maui Taco for a quick bite. The fish tacos are simple but flavorful, and when accompanied by rice and beans, they make a full meal. The nice folks at Maui Taco shared this recipe with me years ago, and I’ve been making it ever since. For some reason, I just now thought to share it with others.

It’s surprisingly simple, incredibly flavorful and versatile. You can serve it alongside tacos as I’ve shown here or put it in a larger wrap when making burritos. You can top a bit of it with a fried egg, some sliced avocado and a little salsa or hot sauce for a satisfying breakfast. You can serve it with all the taco/burrito fixings over lettuce and make a healthy taco salad. I actually like it so much that I will eat a bowl all by itself in lieu of dessert.

I served the rice pictured here with tacos filled with meatless “Beefy Crumble,”  radish micro greens, sliced avocado and fresh salsa. I’m not a huge fan of faux meat, but I really like the ground beef substitute by Beyond Meat. We get the “Feisty” version which is very flavorful and made with pea protein (instead of soy, which as you may know, I generally avoid).

rice angle

taco


Ingredients

3 tbsp extra-virgin olive oil

1/2 cup red onion, finely diced

2-3 garlic cloves, minced or crushed

1 cup long-grain rice

1 1/2 tbsp tomato paste

3 cups organic (or homemade!) chicken stock*

Sea salt to taste


Preparation

Heat the oil in a 12-inch cast-iron or similar skillet over medium heat. Add in the onions and a pinch of salt. Cook until the onion softens and begins to turn translucent. Add in the garlic and cook, stirring regularly, for another 2-3 minutes.

Push the onion/garlic mixture to the edge of the pan and add in the rice. Cook, stirring occasionally until the rice begins to brown a little. Stir in the tomato paste until fairly well-blended. Slowly stir in the chicken (or veg) stock. Bring to a boil. Turn down the heat and simmer the rice covered for 20 minutes. Stir and season to taste with salt.

Serve immediately or at room temperature. Store leftovers in an airtight container for up to three days.

Enjoy!

Read Full Post »

prune above


I classify this meal, along with just a handful of others, as one of those you can whip up in about 30 minutes with little to no planning. Sometimes I forget this particular recipe is an option, and then at 5:30pm when I’m standing in my kitchen, panicked about what I’m going to cook up and serve by 6:00pm, it strikes me. The children have started circling the kitchen island like large very vocal vultures with softer noses and lighter coloring. If you have a package or two of chicken thighs or a cut-up chicken, you’re likely to most if not all of the other ingredients needed.

This meal comes together easily and has a sweet, tangy sauce that my whole family loves, plus I love any meal that essentially uses just one dish! You could substitute other vegetables, but onions and carrots can always be found in my fridge and pantry, and they compliment the sauce well.

Ingredients

1 tbsp extra-virgin olive oil
1 medium onion, sliced into wedges
4 large carrots, peeled and cut into 1/4-inch slices
1/3 cup apricot jam or other stone-fruit jam (I use a low-sugar apricot “spread”)
1 1/2 tbsp Dijon mustard
3/4 tsp sea salt
1/4 tsp ground pepper
6-8 chicken thighs
1 cup pitted prunes
1/4 cup water
1 tbsp apple cider vinegar

prune chop


Preparation

Preheat oven to 450F.

Heat olive oil over medium-high heat in a large, oven-proof skillet. Add chicken and brown on both sides. Remove chicken onto a plate and set aside. Pour off the fat from the skillet except for 1 tbsp.

prune pan

Add onions, carrot and garlic and saute for about 2 minutes. In a large bowl, whisk together jam, mustard, salt and pepper. Add chicken pieces and toss to coat evenly.

prune oven ready

Scatter prunes over the onions and carrots. Top with the chicken. Mix the water and vinegar in a small bowl and pour into the skillet. Bring to a boil, cover and reduce heat to simmer. Cook for 5 minutes. Remove cover and place skillet in the middle of the oven. Roast for 20 minutes. Serve immediately.

You can serve this dish with a bowl of soup or side salad, or serve the dish over rice.

Enjoy!

Read Full Post »

quiche abovequiche close

I simply love this dish! It’s easy to prepare, chock full of many of my favorite things, and I love that you can serve it for breakfast, brunch, lunch or dinner. For breakfast or brunch, I like to serve it with a beautiful bowl of ripe berries or other fruit. For lunch or dinner, I’ll pair it with a simple side salad. It also fits with my long-time mantra: “eggs with anything.”  In the past, when I’d found dinnertime nearly upon me, the day having zipped by without a chance to run to the store of think of a meal, I would whip up an omelet or quiche using whatever ingredients could be found in my fridge. It’s a trick of the French, and it will never fail you.

But back to the quiche. I’ve made it using a regular as well as a gluten-free crust. Both hold up fine in this dish, so take your pick. Although the recipe below calls for kale, chard works equally well. You can also substitute goat cheese for feta, although I’m really in love with sheep’s milk feta at the moment. It doesn’t seem to aggravate my stomach the way cow’s milk products do.


Ingredients for the crust

1/2 cup all-purpose gluten-free flour

1/2 cup sorghum flour

1/4 cup almond flour

1/2 cup (1 stick) butter, chilled (or use coconut oil if you’re dairy-free)

1/4 tsp sea salt

2-3 tbsp ice cold water


Ingredients for the filling

1 tbsp extra-virgin olive oil

1 tbsp butter or ghee

1 large leek, trimmed, thinly sliced (white and light green parts only) and carefully washed

1 handful fresh kale, carefully washed, ribs removed and chopped into 1/2-inch strips

3 strips thick-cut quality bacon

1/2-2/3 cup feta cheese

A few tbsp fresh herbs, such as basil or oregano, chopped (optional)

4 large eggs

1 cup milk

Sea salt and fresh-ground pepper


Preparation

Heat the oven to 375F.

In a medium-size bowl, whisk the flours and salt until combined. Slice in the chilled butter, and mix with the flours using a pastry cutter, two knives or your hands  until there are no chunks larger than pea-size. Sprinkle in a little ice water–1 tbsp at a time, and continue mixing until the dough holds together well. Scrape the contents into a 9-inch pyrex or ceramic pie dish and press the dough into the bottom and up the sides to form your crust. Bake in the oven for 10 minutes, then set aside.

quiche crust


While the crust is baking, fry the bacon strips over medium heat until cooked but still tender, not crisp.

Meanwhile, melt 1 tbsp butter or ghee with the oil in a large cast-iron skillet or similar pan over medium-low heat. Add in the leeks and cook, stirring occasionally, until the leeks are soft and turning a little translucent. Add in the kale, and cook until the kale has softened, about 2-3 minutes.
quiche leeks
In a separate bowl, whisk the eggs with the milk until thoroughly combined. Whisk in a few grinds of pepper and a pinch or two of salt, and the fresh herbs, if using.
quiche bacon layer
Arrange the leeks on the bottom of the quiche. Spread the cooked kale on top of the leeks as the second layer. Make the bacon your third layer. Pour the egg mixture over. Crumble the feta cheese over the top and place in the middle of the oven. Cook at 375F for 10 minutes, then reduce heat to 350F and cook for an additional 25-30 minutes or until the quiche is “set,” and the crust is golden brown.
Allow the quiche to cool for 5-10 minutes before serving.
Enjoy!
quiche kale

Read Full Post »

Cook the Beans

inspired by ingredients, smells and Travels, vegan & vegetarian

Cooking Without Limits

Food Photography & Recipes

Selma's Table

Life doesn't have to be perfect to be wonderful - stories and recipes from a wonderful life...

%d bloggers like this: