I was so excited to get that last post out that I forgot to include the recipe for the Spiced Pepitas! If you go to my site, you’ll see it’s been updated now. Many apologies!!
Feeling tired too much of the time? Feeling pretty good in the morning, but fighting a serious slump in the afternoon between 2:00pm and 4:00pm? I’ve experienced days where I thought I could literally fall asleep standing up–and it usually hit me around 3:30pm. It’s one of the main reasons I did food-sensitivity testing, “went Paleo”, gave up gluten (95% of the time), etc. In the end, I think I was getting exhausted in the afternoon because my energy stores were simply too depleted by that time. My body essentially had nothing to draw on. I have taken specific and deliberate measures to change the situation, but I still have some pretty sluggish afternoon moments.
So many of us find ourselves overstretched on our commitments and overtaxed on everything else, especially in America where most jobs don’t abide by the 9-5 rule. Whether real or perceived, many people I know feel they’re expected to work 70+-hour weeks. Commutes have become longer and more stressful. I think mothers suffer the most… In many cases, even if they’re career women, they’re expected to work full-time and take care of the kids and the home, participate in school, etc. And moms who have quit or taken a break from their careers aren’t exempt. They’re often expected to volunteer significant hours at school, serve on non-profit boards, plan fundraisers, while raising the kids and taking care of the home.
Daily and chronic fatigue can result from many things, and what other expect of us and what we expect of ourselves is another discussion, but consider these common, relatively easy to remedy, causes of tiredness:
Dehydration
One of the most common causes of fatigue, is also one of the easiest to remedy. When your body doesn’t have enough fluid in it, your blood thickens making it harder for your body to get oxygen to your cells for ultimate functioning. Aim for 8-11 cups a day of filtered water, herbal tea or natural coconut water. Just take care to avoid too much caffeine (the relatively small amount in green tea is fine) or caffeinated drinks enjoyed too late in the day where they could disrupt your sleep. And beware of drinks containing too much sugar–including many juices and some smoothies, which will only cause your insulin level to spike and your energy to crash.
I like energy-boosting teas, such as Yogi Tea’s Sweet Tangerine Positive Energy with black tea, green mate, ashwagandha root and ginseng.

Snacks
Snack on whole foods that provide quick energy along with plenty of nutrients. For example, pumpkin seeds give you…. I’m not a huge fan of seeds, but spiced pumpkin seeds are delicious, and offer just enough saltiness and zing to make them practically addictive. Try the recipe below from the ZenBelly Cookbook. A banana is a perfect mid-morning or afternoon pick-me-up snack. In addition to three natural sugars, bananas contain fiber so you get an instant and sustained boost of energy.
Unless you’re strictly Paleo, be sure to consume a healthy portion of whole grains at lunch–barley, millet and quinoa are all good choices (unless, of course, you have an allergy to quinoa like I developed three years ago). Whole grains offer a sustained source of energy.
Have a low-sugar and nutrient-dense bar or slice of bread on hand for when he hunger pains strike or you start to feel drowsy. I like to make my own food, so I rarely buy “energy” bars, but there are some good ones available now that provide plenty of protein and fiber without a ton of sugar. I prefer to have a slice of grain-free bread such as the “loaded banana bread” from the ZenBelly Cookbook. I’ll be posting my modified recipe in the next few days.

Sleep and body function
If you constantly feel overly tired, consider getting tested for thyroid dysfunction or hormonal imbalances. Avoid any screens at least an hour before you aim to go to sleep or buy yourself a pair of amber lenses that block blue light (and use them!). Also be sure to fall asleep by 10:30pm–latest, to work with your circadian rhythms for improved sleep and brain function.
Exercise
Make sure you get regular exercise, which studies show improves energy and sleep quality. Regular exercise also boosts mood, helps balance hormones and serves as a great stress reliever. So many people think they can’t make time for it, but exercise enables you to do more more efficiently–in other words, it uses time but actually buys you time. And even though my friends would call me a hypocrite to hear me say this, make time to relax and recharge your inner batteries.
Spiced Pepitas
Recipe from Zenbelly, although I slightly upped the amounts on all the ground spices.
Ingredients
1 1/2 cups raw pumpkin seeds
1 tbsp lemon, orange or lime juice
3/4 tsp finely ground sea salt
1/2 tsp ground cinnamon
1/8 tsp chipotle powder
1/2 tsp ground cumin
1/2 tsp ground coriander
1/4 tsp smoked paprika
1 tsp coconut sugar
Preparation
Preheat oven the 375F. Line a rimmed baking sheet with parchment paper.
In a medium bowl, mix all the ingredients together. Toss well to combine.
Spread on the prepared sheet and bake for 5 -7 minutes, or until the seeds become crisp and slightly puffed. Allow to cool completely before storing in an airtight container. The seeds keep for weeks, but if they lose a little crunch, you can reheat them in a 350F oven for 2-3 minutes.
Be well and full of energy!
Posted in General nutrition, Tips | Tagged ashwagandha, dehydration, energy, energy boosters, fatigue, ginseng, whole grains, yogi tea, Zenbelly | 4 Comments »


“Blondies”–along with really good shortbread and perfectly-cooked snickerdoodles, continue to top my list of favorite cookies. I’ve always loved “blondies” more than “brownies.” I can’t say what it is except that I like my chocolate in small doses and brownies just seem like too much of a good thing. I also like how blondies offer a subtle butterscotchy-maple flavor–something that hints of a more decadent dessert, such as sticky toffee pudding.
I’ve been tinkering around with this recipe for a few weeks, and I finally like where it is. First, these cookies can be made in about 30 minutes with less than 10 minutes of actual work time involved! Second, the top is a little crunchy while the inside is fairly gooey/chewy. They’re not super low sugar like many of my desserts, but they have substantially less sugar than many of their counterparts.
These blondies are also loaded with protein, and they’re gluten-, egg- and dairy-free to boot.
Ingredients
1/2 cup + 2 tbsp almond butter or other nut butter (I like to use half almond, half cashew)
1/4 cup non dairy milk, such as almond or coconut
2 tbsp maple syrup
1/2 cup coconut sugar or other unrefined sugar
1 tbsp vanilla extract
1 cup gluten-free flour (I use 1/2 cup all-purpose plus some arrowroot and cassava flours)
Scant 1/2 tsp baking soda
1/4 tsp salt
1/4 tsp cinnamon
1/2 cup raw pecans, finely chopped
1/3 cup vegan chocolate chips (I like this brand)
1 tsp coconut oil

Preparation
Preheat the oven to 350 degrees F. Grease an 8×8-inch baking pan and line the bottom with parchment paper.
In a bowl, mix the almond butter, non dairy milk, coconut sugar, maple syrup and vanilla until well combined and smooth.
In a small mixing bowl, whisk together the flour, baking soda, salt and cinnamon. Stir the dry ingredients into the wet and mix until just combined.
Fold in the chopped pecans. Drop the very thick stiff batter into the pan. Using a spatula, press the batter down to even it out in the pan.
Bake for 20 to 25 minutes, or until the top is be set. While the blondies are baking, melt the chocolate chips and coconut oil in a small saucepan over very low heat. When the blondies are out of the oven, drizzle the melted chocolate mixture over the pan. Let the blondies cool for 15 minutes before slicing. Makes 9 cookies approximately 2 inches by 2 inches.
Enjoy!


Posted in Desserts, Recipes | Tagged blondies, dairyfree, easy bar cookies, eggfree, eggless, glutenfree, high-protein, vegan cookies | Leave a Comment »


These gluten-free, grain-free scones have become a favorite in my home. They boast enough flavor on their own that you don’t need to add jams or spreads (although I think a light spread of whipped coconut cream would make them taste even better). I also like that they don’t come out too dense like so many recipes that rely primarily on almond flour. The three to one ratio of almond to potato starch ensure these baked treats come out light with a beautiful crumb and a slightly crunchy top.
This recipe is just slightly altered from the one in Brittany Angel’s wonderful Paleo cookbook, “every last crumb.” I use slightly less sugar, chocolate chips and fruit. You can use dried cranberries, currants or other dried fruit in place of the cherries. They all work well!
Ingredients
1 1/2 cups blanched almond flour
1/2 cup potato starch, plus a little extra for the work surface
1/2 tsp baking soda
1/2 tsp kosher salt
1/2 cup or 1 stick chilled unsalted butter or butter substitute
1/3 cup coconut or evaporated cane sugar
2 large eggs
3/4 tsp apple cider vinegar or lemon juice
1/4 cup chocolate chips*
3/4 cup cherries, fresh, frozen or dried, halved and pitted*
2 tbsp tapioca starch for dusting the cherries
*Brittany’s recipe calls for 1/2 cup sugar, 1/2 cup chocolate chip and 1 cup fruit. I think the scones can handle as much as you want. For me, it’s more a question of whether you’re wanting a breakfast bread replacement or dessert.
Preparation
Preheat the oven to 350F.
In a large bowl, whisk the almond flour, potato starch, baking soda and salt. Cut in the butter until the mixture consists of pea-sized lumps.

In a small bowl, whisk the eggs. Whisk in the sugar and vinegar. Pour into the flour mixture and mix briefly–just until the dough comes together. Do not overmix.
Fold in the chocolate chips.
In a small bowl, toss the cherries in the tapioca starch. Fold into the dough.
Dust a sheet of parchment paper with a couple tablespoons potato starch. Place the dough on the dusted paper and pat into a circle about 6-7 inches in diameter. Slide the parchment paper onto a baking sheet. Note: I like to slice my scones before baking, but Brittany’s recipe calls for popping the scones in the oven now and slicing later.


Bake for 35-40 minutes or until firm and golden. (You can cover with foil halfway through baking if you find your scones are at risk of becoming too dark, but this hasn’t happened to me yet.)
Note: Brittany suggests melting an extra 1/2 cup chocolate chips for 1 minute in the microwave, and drizzling it over the scones when they’re out of the oven.
Allow to cool slightly before serving. Serves 6.
Enjoy!
Posted in Recipes | Tagged brittany angell, cherry chocolate, dairy-free, every last crumb, gluten-free, grain-free, paleo bread, Paleo scones, scones, vegetarian, wheat-free | Leave a Comment »


Happiest of New Years!
I hope 2016 brings you great health, much love and joy, and a little adventure. I feel we should never stop seeing and experiencing new things, nor should we ever cease to be amazed by all the wonderment in this world, don’t you agree?
In case you noticed, I took a little hiatus… a little time to focus on my other work, and most importantly, focus on my family. I find that additional attention and caring always pays back in tens if not hundreds. Sometimes I need to remind myself that my children will not stay little and young, and that what I say to them and do with them now is what matters most. And just like people constantly tell other parents who have babies or toddlers, children do grow unbelievably quickly, and every day is a treasure, a chance to build a memory that will last a lifetime.
I hope your holiday was cheerful and warm. We spent ours close to home, making two short trips to the snow just before and after Christmas. Last year we skied in T-shirts, but this year mandated we buy extra protection so that not one millimeter of skin was exposed to the freezing temperatures, fierce winds and blowing snow. I will share some great winter skin savers in the next couple weeks along with some recipes for nourishing, warming food, which is what I crave most during these cold–in our case, wet, months.
These are two of my favorite chili and cornbread recipes, both of which I’ve made vegan as well as with animal products. I’ve included notes about how to alter each so you can easily adapt the recipe to your dietary preferences.
The addition of cocoa powder and chipotle peppers makes the chili recipe extra delicious. And I love that I can cook a big pot made mild enough for all ages, and easily add in the chipotle peppers at the very end for those that like the extra kick. The turkey chili recipe (with very small adaptations) is from Cookin’Canuck.
Chili
Ingredients (serves 8)
1 tbsp avocado oil
1 large onion, chopped
1 tsp dried oregano
1 tsp ground cumin
2 garlic cloves, finely chopped
1 1/2 lb ground turkey meat*
1/4 cup chili powder
2 bay leaves
1 tbsp unsweetened cocoa powder
1 tsp coconut sugar
2 tsp kosher salt
1/2 tsp ground cinnamon
1 14 oz can whole tomatoes (with juices)
2 tbsp tomato paste
2 chipotle pepper in adobo, chopped
2 tsp adobo sauce (from chipotle pepper can)
2 cups low-sodium chicken broth*
1 15oz can black beans, drained and well-rinsed
1 15oz can small white beans, drained and well-rinsed
sour cream, grated cheese and chopped fresh cilantro, optional as garnish
*You can easily make this recipe vegan by substituting Beyond Meat Beefy Crumble for the turkey and by using vegetable broth in place of the chicken broth.
Preparation
Heat the oil in a large, heavy pot over medium heat. Add onions and saute until tender and slightly translucent, about 10 minutes. Add garlic and cook an additional 3 minutes.
Add cumin and oregano. Stir for an additional 30 seconds.
Increase heat to medium-high. Add ground turkey, breaking it up into small pieces using a wooden spoon. Make sure the turkey is cooked through.
Add chili powder, bay leaves, cocoa powder, salt and cinnamon. Add whole tomatoes, including juices. Break up the tomatoes using a wooden spoon.
Mix in tomato paste and chicken broth. Note: if you want to serve the chili to children or anyone who might be sensitive to too much spice, wait until the end to add in the chipotle peppers and adobe sauce, or split your chili into two pans at this time so you can add the “heat” to one pot while keeping the other mild.
Bring to a boil, then reduce heat and simmer for at least 1 hour, stirring occasionally.
Add beans and simmer an additional 10-20 minutes.
Serve hot, and garnish if you like.

Now for the cornbread! I love this recipe because it’s rich, moist and full of texture. It’s heavily adapted from a recipe a friend gave me a year ago, and I like that it can be made vegetarian or vegan and is gluten-free.
Cornbread
Ingredients
3/4 cup butter, softened or 3/4 cup coconut oil, melted and cooled
1/2 cup evaporated cane juice
4 eggs or equivalent of Ener-G Egg Replacer
2 tbsp milk or milk substitute
1 tbsp honey
1/2 cup mild green chilies
1 1/2 cup cream-style corn
1 cup all-purpose gluten-free flour
1 cup yellow cornmeal, medium grind
2 tbsp baking powder
1 tsp salt
Preparation
Preheat oven to 325F.
Grease and flour a 9-inch square baking pan.
Mix dry ingredients together in a medium bowl.
In a large bowl, cream butter or oil and sugar using an electric mixer or large whisk. Add eggs, one at a time, beating well after each or if using, beat in egg substitute. Beat in milk and honey. Beat in cream-style corn and chilies. Fold in dry ingredients and mix just until incorporated. Pour into prepared pan.
Bake for 1 hour or until a toothpick inserted in the middle comes out clean.
Serve warm with butter and a drizzle of honey if you like.
Stay warm!!

Posted in Recipes | Tagged best cornbread, Beyond Meat, chili, egg replacer, egg substitute, gluten-free, turkey chili, vegan chili, vegan cornbread, vegan ground beef, wheat-free | 1 Comment »
Many apologies for my delinquency! It’s been a very busy time with my foundation (Empowered by Light), and I simply haven’t found time to finish any posts. I also find winter to be a tricky time to post recipes because even though I’ve been cooking up some delicious dishes, it’s usually dark by the time they’re done, and I really hate to photograph food in anything other than natural light. That said, I have a lot to share, so please don’t be surprised if you see some posts in the near future showing dishes photographed under my kitchen lights. (Actually, a couple of the recipes below were snapped with the lights on, and you’ll see that it really detracts from the richness of color and texture. Maybe I’ll take a photography class next year to learn how to correct this.)
I’m also not sharing my turkey recipe (with sage butter) here–not because it isn’t one of my favorites, but because I only make it at Thanksgiving. And despite careful planning and preparation, I am always scrambling to get everything done on time, and can never manage to snap off a few shots to share with you. Maybe this year will be the year though, and I can share the recipe for next year!
In the meantime, here are some great side vegetable dishes, salads and desserts in case you want something other than the traditional mashed potatoes, green beans and stuffing recipes.
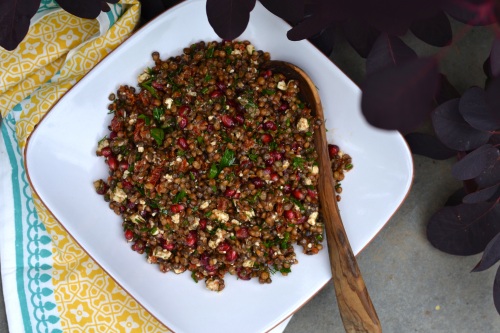
Lentil, pomegranate gorgonzola salad with fresh herbs (recipe here)
Haricots vert with orange and hazelnut (recipe here)

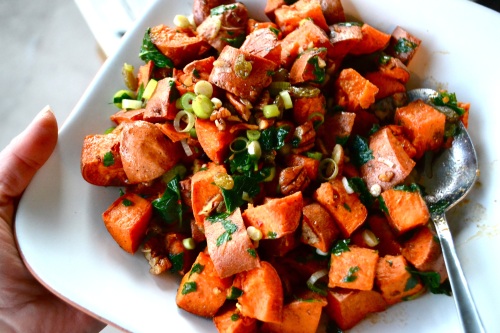
Roasted sweet potato with maple and pecans (recipe here)
Brussels sprout salad with bacon, leek and pomegranate (recipe here)

Sweet potato gratin (recipe here)

Roasted fennel, chickpeas, grapes and peppers (recipe here)

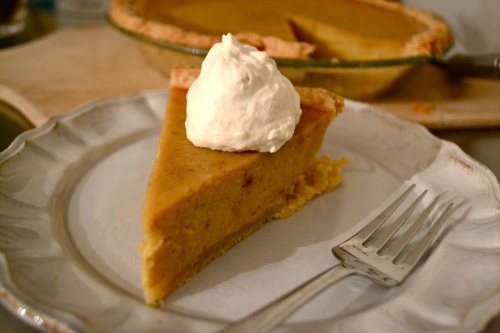
Fresh pumpkin pie (recipe here)
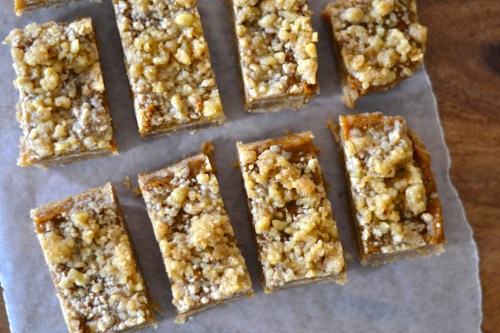
Squash crumble bars (recipe here)
 Plum cake (recipe here)

Mushroom tart (recipe here)

Posted in Recipes | Tagged brussels sprouts, favorite sides, gratin, great vegetable sides, side dishes, squash, sweet potato, tarts, thanksgiving | 1 Comment »


I’m a little late posting this, so please forgive me!
Like the orange and beet salad I shared in my last post, this tart is another great dish for transitioning into autumn. Granted, depending on where you live, you may already be deep into autumn. But this dessert is so insanely simple to make and delicious to devour that I couldn’t wait until next summer to share it!
Here in northern California, we’re lucky enough to have access to fresh blueberries nearly year round, and our fig season is at least six months long. If you have access to fresh blueberries and figs where you live, give this tart a try. You can use black mission figs or the more spectacularly colored kadota figs (shown here).
It’s also one of those desserts that makes an al fresco dining experience that much better. And, of course, like many of my the recipes I share, it’s very low in added sugar, so you feel no guilt when you take a second slice after dinner. This dessert relies on the natural sweetness of fresh blueberries and figs.
Use your own tart crust recipe or my gluten-free version (here).
Ingredients
1 1/4 cup gluten-free flour blend*
1 heaping tbsp cane sugar
1/4 tsp sea salt
1/2 cup (1 stick) chilled butter
2-3 tbsp ice water
8 oz marscarpone cheese
2 tbsp raw honey
1 tsp pure vanilla extract
7-8 smallish figs (black mission or kadota), sliced in half
1 cup fresh blueberries
*I like to use 1/2 cup gluten-free all-purpose flour blend, such as Bob’s Red Mill, 1/2 cup arrowroot powder/flour and 1/4 cup almond flour. You can also sub a little buckwheat flour and alter the almond to arrowroot ratio.
Preparation
Heat oven to 375F.
In a medium bowl, whisk the gluten-free flour blend, 1 tbsp sugar and salt until blended. Using a pastry cutter, two knives or whatever technique you like, cut in the flour until it’s evenly incorporate. Sprinkle a tablespoon or two of ice water and continue mixing, adding a little more water if necessary until there is no more dry flour on the bottom of the bowl, but the mixture should still seem quite dry.
Dump the contents into a 9-inch tart pan and press the crumbly mixture into the bottom and sides of the pan, being careful not to work the dough too much (or it will get tough!). Chill in the fridge until the oven is ready.
Bake crust for about 15 minutes or until golden. Place on a rack to cool.
While the crust is cooling, whisk the mascarpone cheese with 1 tbsp of honey and the vanilla until you have a spreadable mixture.
When the crust has cooled enough to touch, carefully spread the mascarpone over the bottom of the crust in an even layer. Top with the fruit–either in a pattern or simply dropped in a haphazard fashion, and drizzle with 1 tbsp honey.
Serve slightly warm or at room temperature.
Enjoy!

Posted in Desserts, Recipes | Tagged blueberry tart, Bobs Red Mill, figs, fresh fruit tart, fruit tart, gluten free crust, gluten free flour, low sugar desserts, wheat-free | 3 Comments »


I think this constitutes one of those perfect salads for slipping from summer into fall. The colors make you anticipate the darker colors of autumn–darker lipstick, clothes, leaves, etc., and this combination works beautifully served al fresco with grilled meats or inside with a roast chicken.
This recipe (ever so slightly modified) comes from one of my favorite new cookbooks The Homegrown Paleo Cookbook by Diana and Andrew Rodgers. I love their approach to cooking and farming, and in addition to lots of amazing recipes, they also share lots of valuable information–for that day I have my own small, working farm!

Ingredients
4 medium beets
2 tbsp extra-virgin olive oil
1 tsp quality balsamic vinegar
2 oranges
Juice of 1/2 a lemon
1 tsp raw honey
Sea Salt and ground black pepper
1 small head radicchio, carefully cleaned and torn into bite-size pieces
1 endive, leaves separated and carefully washed
1/4 cup fresh parsley, finely chopped as garnish
Preparation
Heat the oven to 375F. Wrap each beet in a square of foil and roast for 34-40 minutes, or until tender.
Remove the beets from the oven, and allow them to sit until they’re cool enough to handle. Remove the peels by gently rubbing and sliding your fingers along the skin or use a peeler, then slice them into 3/8-1/4-inch thick rounds. Place them in a large bowl and toss with the vinegar.
Peel the oranges and slice them into 1/4-inch thick rounds.
In a small bowl, whisk together the olive oil, honey and lemon juice. Season to taste with salt and pepper.
Place the endive and radicchio in a bowl, drizzle the dressing and toss to coat.
You can serve this salad family style on one large platter or divide among 6 plates. Start by laying down the endive and radicchio, then layer on the oranges and beets. Garnish with the chopped parsley and a grind of pepper.
Serve immediately.
Posted in Recipes | Tagged autumn, beets, colorful salads, fall salads, Homegrown Paleo, oranges | Leave a Comment »

I haven’t posted in a while, but I’ve been cooking and eating plenty. Aside from a two-week holiday to six East Coast cities and towns, I have spent countless hours in biblical history. What’s that, you say? Well, in reality, it’s likely just the result of the drought we’re experiencing throughout California, but we’ve been plagued with everything from mites on the chickens to fleas on the cats to ants invading our kitchen. And I’m not alone in this plague of pestilence. Even the restaurants in our local towns have been battling the ant problem. Ask for a cup of tea, and you’re likely to get it with a pinch of tiny ants. Every possible little pest is hungry and thirsty and running amuck since temperatures continue to run higher than normal and their normal food supplies are scarce–or so I’ve been told. Now I could launch into a larger discussion about global warming, but let’s save that for another time and get back to food.
The most amazing plums keep piling up on the produce stands in my area. They’re rich in color, incredibly juicy and sweet as can be. I don’t know many recipes that use plums, but plum crisp would beat them all anyway. I find that cooking plums with a little lemon zest and sugar really concentrates their flavor. I’ve made this crisp using plums and apples, but plums alone offers the most intense flavor.
Ingredients
7-8 plums and/or pluots, pitted and quartered
zest from a lemon
1 tsp pure vanilla extract
1 tsp cornstarch (optional)
1 tbsp coconut or cane sugar
3/4 cup porridge oats
1/4 cup walnuts, finely chopped
1/2 cup almond flour/meal
1/2 coconut or cane sugar
1 pinch of sea salt
1/2 tsp ground cinnamon
1/2 cup (1 stick) unsalted butter, chilled and cut into 8 pieces
Preparation
Preheat the oven to 375F.
In a medium-size bowl, mix the plum segments, lemon zest, and vanilla. Sprinkle with 1 tbsp sugar and the cornstarch if using, and toss to coat evenly. Evenly divide and scoop the fruit mixture into four ramekins.


In another bowl, mix the dry ingredients together with a fork. Break down any lumps in the almond flour and stir until everything is thoroughly combined. Using a pastry cutter or two knives and two good hands, cut the butter into the flour mixture until it resembles coarse crumbs. Spoon out evenly over the fruit in the four ramekins.

Place the ramekins in the oven and cook for 20-30 minutes or until the crumb topping turns golden brown and the fruit mixture is bubbling. Remove from oven and place on a wire rack. Allow to cool for at least 20 minutes (or tongues will get burned!).
Serve warm or at room temperature with a scoop of vanilla ice cream or coconut milk ice cream.

Enjoy!
Posted in Desserts, Recipes | Tagged easy desserts, fruit desserts, gluten free desserts, plum crisp, plums, vegetarian, wheat-free | 2 Comments »


I’m still sticking to the egg-free diet in solidarity with my daughter. It’s been two months, and I admit, it’s been easier than expected. I think the thing I miss most and have to hassle with most often is aioli. I rarely eat sandwiches, but when I do, some sort of aioli, is usually part of it–think pesto, cilantro or roasted red pepper aioli. I also eat French fries infrequently, but when I do, they’re usually sweet potato fries, and I only want to dip them in wasabi aioli.
I also miss all the baked goods I made regularly. I’ve learned it’s tough to give up eggs and be gluten-free or grain-free. All those grain-free treats I made using almond flour instead of regular wheat flour require eggs, and egg replacers only work some of the time.
But my determination to offer my daughter familiar things, has led me to try numerous egg-free recipes, some of which have been disastrous while others have been huge hits. For example, the egg-free pancakes I posted last now stand as her favorite pancakes, and it appears that the previous oatmeal and egg version she loved is all but forgotten. The egg-free waffles I’ve been experimenting with still aren’t ready to share, but I’m starting to wonder if part of the problem is my actual waffle iron, which has to be close to 20 years old.
These cookies definitely make the grade. They boast great flavor, texture and just the right amount of sweetness, and the inside of the cookies stay chewy while the outer edges get crispy–just how we like our cookies to be! I make mine with butter, but you could easily substitute coconut oil for the butter and make completely vegan cookies.
(Adapted from Madhuram’s Eggless Cooking.)


Ingredients
1 cup all-purpose flour
1 cup whole-grain spelt flour
1/4 cup flaxmeal
1 tsp baking soda
1/4 tsp salt
1/2 tsp ground cinnamon
1 cup (2 sticks) butter, softened
1/2 cup (scant) granulated sugar
1/2 cup (scant) brown sugar
2 tsp pure vanilla extract
4- 1/2 teaspoons Ener-G (egg substitute)
6 Tbsp water
1/2 cup semi-sweet chocolate chips*
1/2 cup walnuts, finely chopped (optional)
*I like to use the Enjoy Life Vegan Chocolate Chips
Preparation
Preheat oven to 375F/190C. Line two cookie sheets with parchment paper to fit.
In a large bowl, cream together the butter, sugars and vanilla using an electric mixer.
Put the egg replacer in a small bowl and whisk in the water gradually until thoroughly blended. Add this mixture to the butter mixture and blend until thoroughly combined.
In another bowl, whisk together the flour, baking soda, cinnamon and salt.
Fold the flour mixture into the wet mixture and stir until just blended. Fold in the chocolate chips and nuts, if using.


Using a tablespoon, drop the dough onto the baking sheet. (The dough can be quite sticky, so I usually use two spoons for this.)

Bake 10 -12 minutes, or until the edges are golden brown.
Let cool for at least 5 minutes, then enjoy warm or at room temperature. You can store the cookies for several days in an airtight container.
Yields approximately 24 3-inch diameter cookies.
Enjoy!
Posted in Desserts, Recipes | Tagged egg substitute, eggfree, eggless, eggless chocolate chip cookies, Ener G, Enjoy Life, vegan | Leave a Comment »
-
Search
-
Recent Posts
Categories
- Books (2)
- Desserts (35)
- General nutrition (49)
- Organic (15)
- Products (28)
- Recipes (190)
- Tips (54)
- Travel (15)
- Uncategorized (26)
Blogs I Follow


Must Reads
Instragram photos
No Instagram images were found.
